Introduction
ClickUp's forms simplify data collection and task automation with an easy-to-use drag-and-drop builder. You can create customizable forms with fields like text boxes, dropdowns, and checkboxes, making information capture efficient.
ClickUp forms provide cost-effective benefits. They eliminate the need for extra subscriptions and manual data export. As an alternative to tools like Tally or Typeform, they show to create forms that excel at collecting structured feedback. They also replace the need for separate data collection apps like Google Forms or JotForm by smoothly integrating data into ClickUp. In this article about ClickUp forms tutorial, we explain everything you need to know about ClickUp Forms!
We also made a video about ClickUp forms if you prefer video format:
Key takeaways
- ClickUp Forms let you collect information and automatically create tasks from each submission.
- The drag-and-drop builder makes it easy to add built-in task fields and custom field types.
- You can customize the form’s layout, theme, background, and button colors to match your brand.
- Hidden fields and conditional logic help you simplify the form experience and collect more relevant data.
- Advanced settings allow you to auto-assign tasks, apply templates, and even add custom field answers to the task description.
- Forms can be shared via direct links or embedded on your website.
- For more complex needs, you can integrate external form tools like Typeform or Jotform with ClickUp using automation platforms.
- Using ClickUp Forms helps centralize data collection, automate task creation, and improve collaboration across your team.
What Are ClickUp Forms and When Should You Use Them?
ClickUp Forms are a built-in feature that lets users submit information either internally or externally and convert that input into a usable task inside ClickUp. ClickUp Forms work best for simple data collection where you need to gather basic information and transform it into tasks.
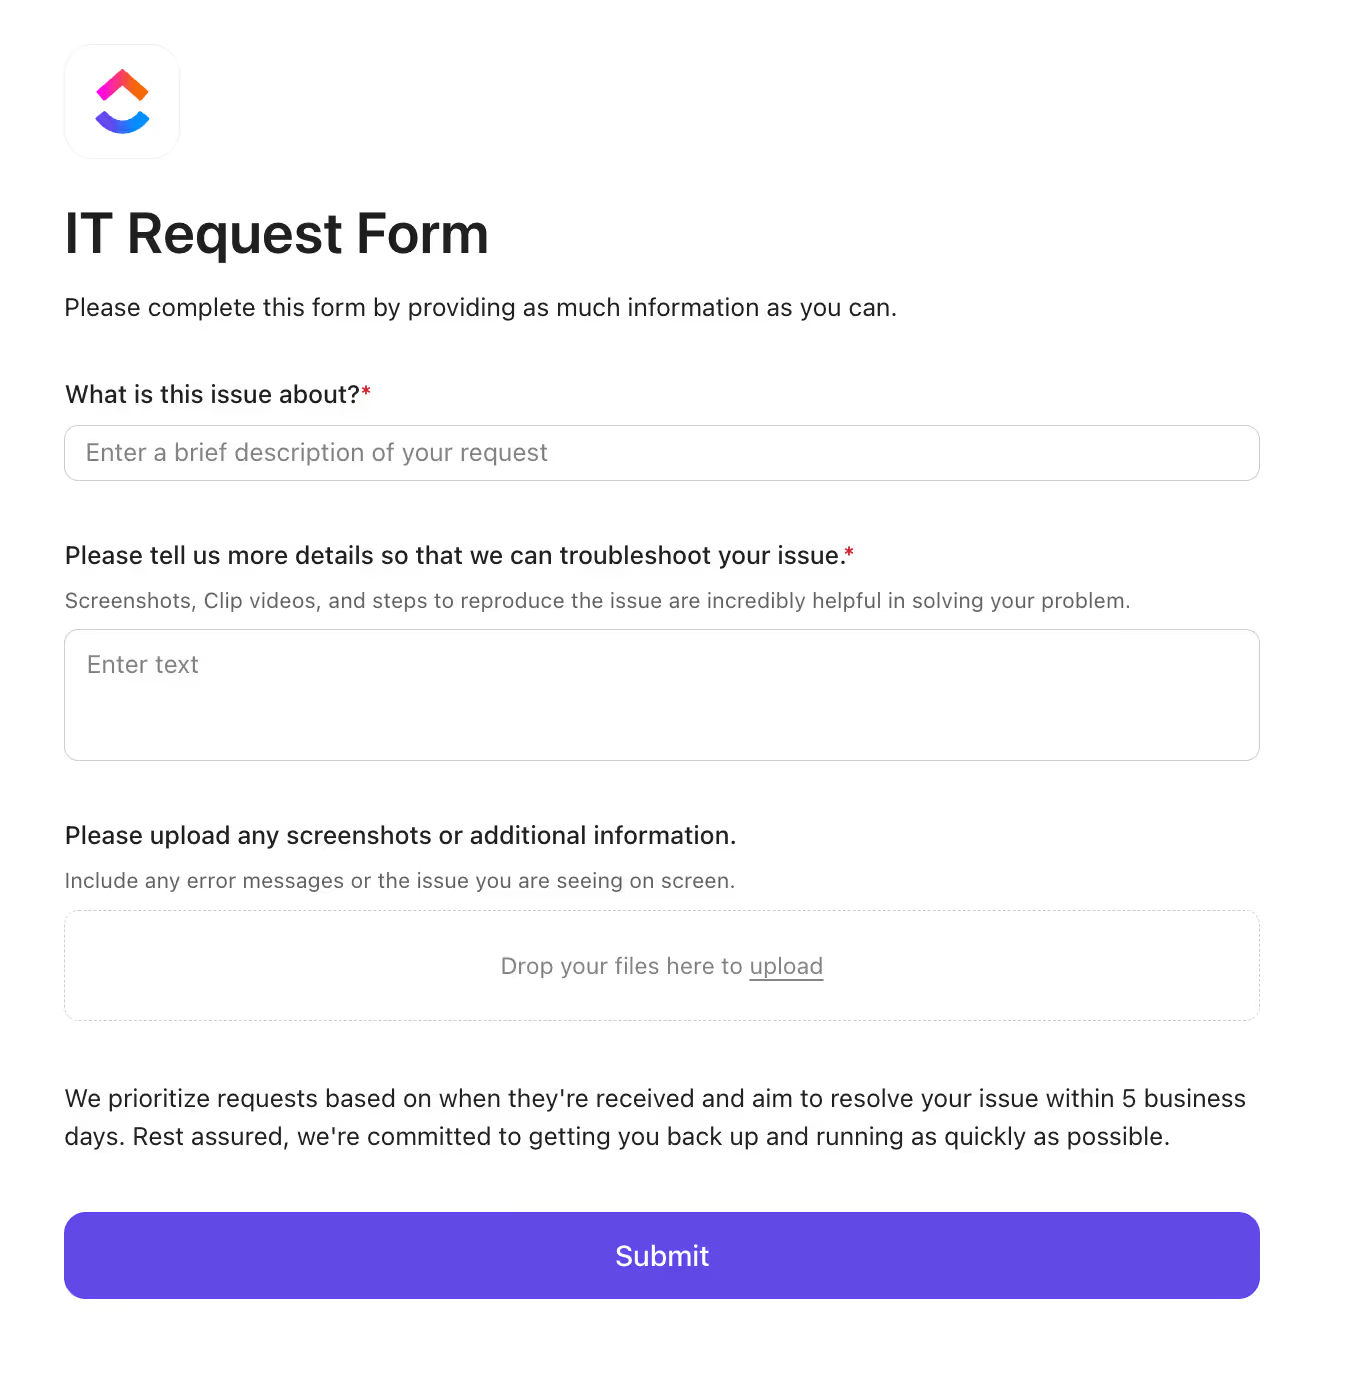
ClickUp Forms
These forms excel at collecting names, descriptions, comments, and other straightforward data points. Common use cases include:
- Collecting bug reports from users
- Processing hiring applications
- Managing internal requests
- Gathering customer feedback
- Creating support tickets
- Processing leave requests
Since the result is always a ClickUp task, the form acts as the intake method to bring in usable information.
The Limitations of ClickUp Forms
ClickUp's built-in form builder may not be sufficient for complex needs such as:
- Conditional logic based on user answers (e.g., “If answer is X, show question Y”)
- Surveys and quizzes with scoring logic
- Multi-page forms with progress tracking
- Forms with more than 10-15 questions
- Legal or compliance-oriented submissions requiring field validation
ClickUp offers basic conditional logic, but it’s more suited for light logic actions than full decision-tree logic. If you need something more dynamic, several specialized platforms offer better capabilities:
- Typeform – Great UX, conditional logic, visual flow
- Jotform – Easy mapping and native ClickUp integration
- Tally – A Notion-like interface ideal for fast creation with Make integration
- Paperform – Visually elegant and friendly to embed
- Fillout – Useful for forms-heavy workflows with large field counts
Step-by-Step Guide of Building a Basic ClickUp Form
Let’s walk through building a simple ClickUp Form that can be shared externally without needing to give users access to your ClickUp workspace.
Step 1: Create a Form View
The first crucial decision is where to create your form. While you can create forms at the Space or Folder level, doing so requires specifying where responses should go.
Best Practice: Create form views directly within the list where you want tasks to appear. This approach clarifiies about where submissions will land.
For our example, we'll create a form in a list:
- Navigate to your list.
- Click the "+" icon to add a new view.
- Select "Form" as the view type.
- Name your form view (e.g., "Project Intake Form").
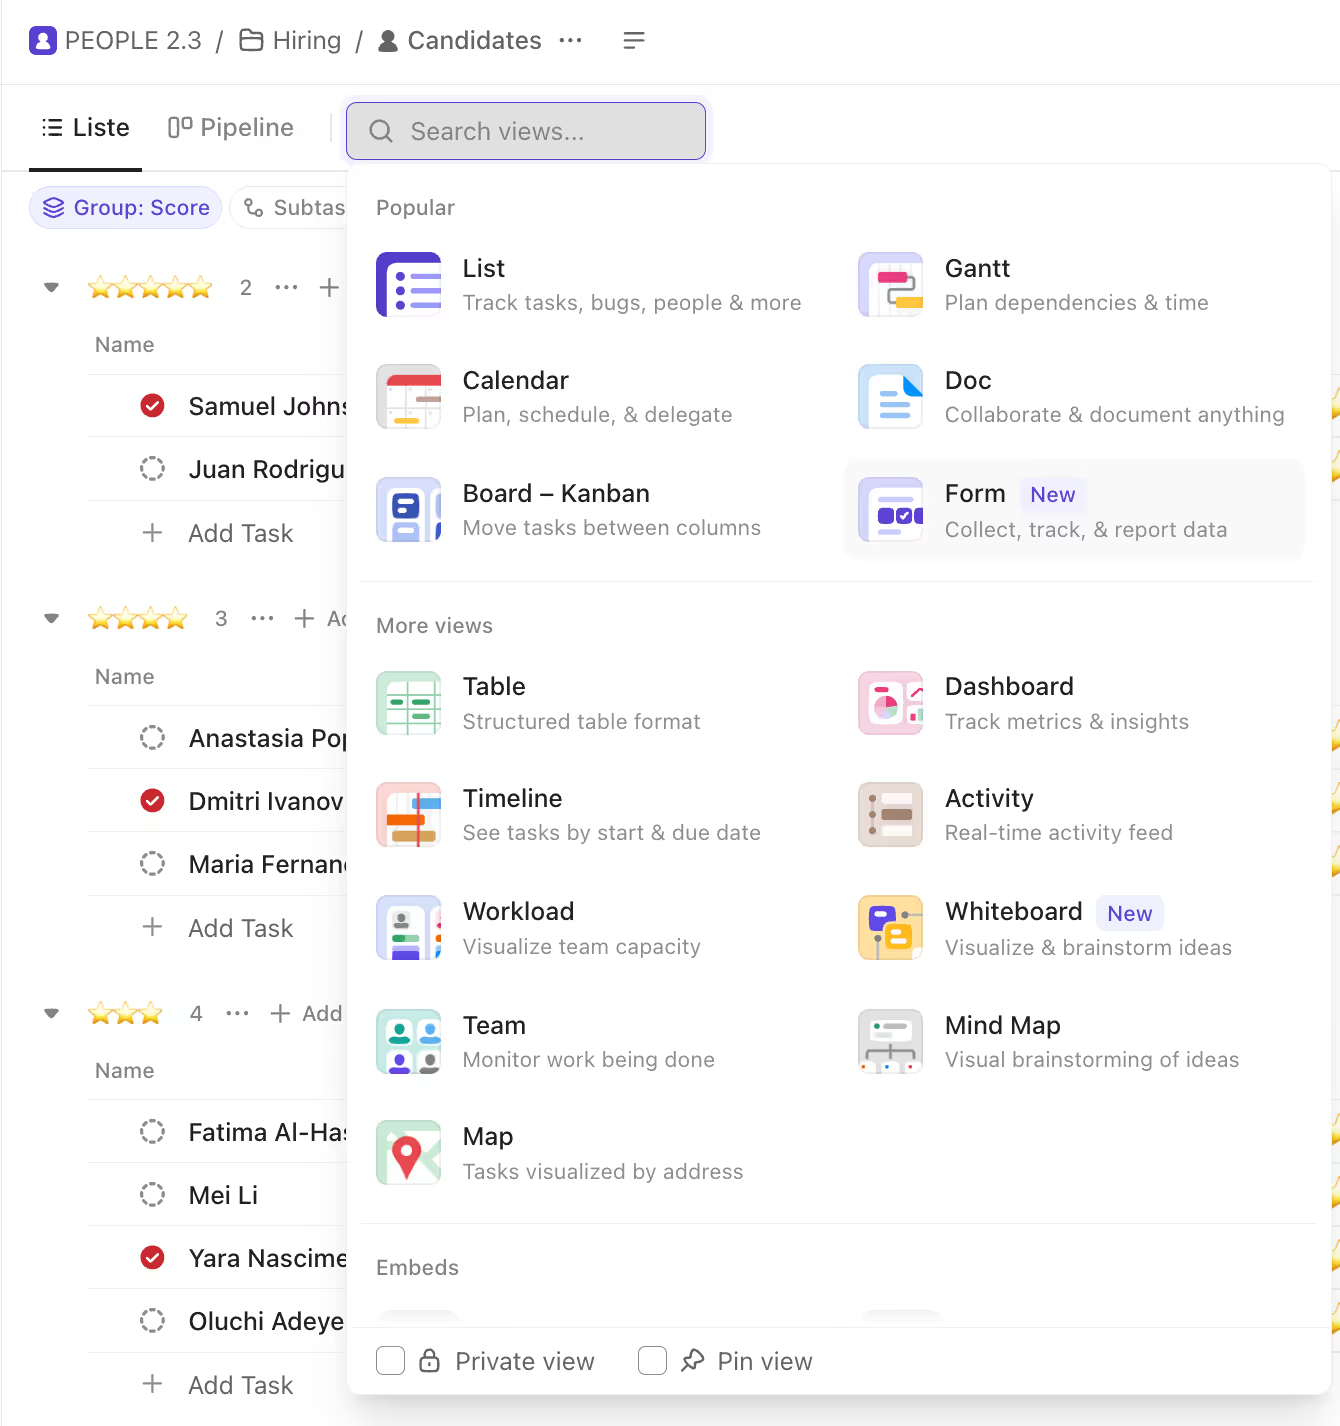
Adding a form view in ClickUp
Step 2: Design Your Form Structure
Once your form view is created, you'll need to design its structure:
- Add a Title: Name your form (e.g., "Project Intake Form")
- Upload a Logo: Add your company logo for branding.
- Create an Introduction: Add a brief paragraph explaining the form's purpose.
- Add Form Fields: Insert the fields needed to collect relevant information.
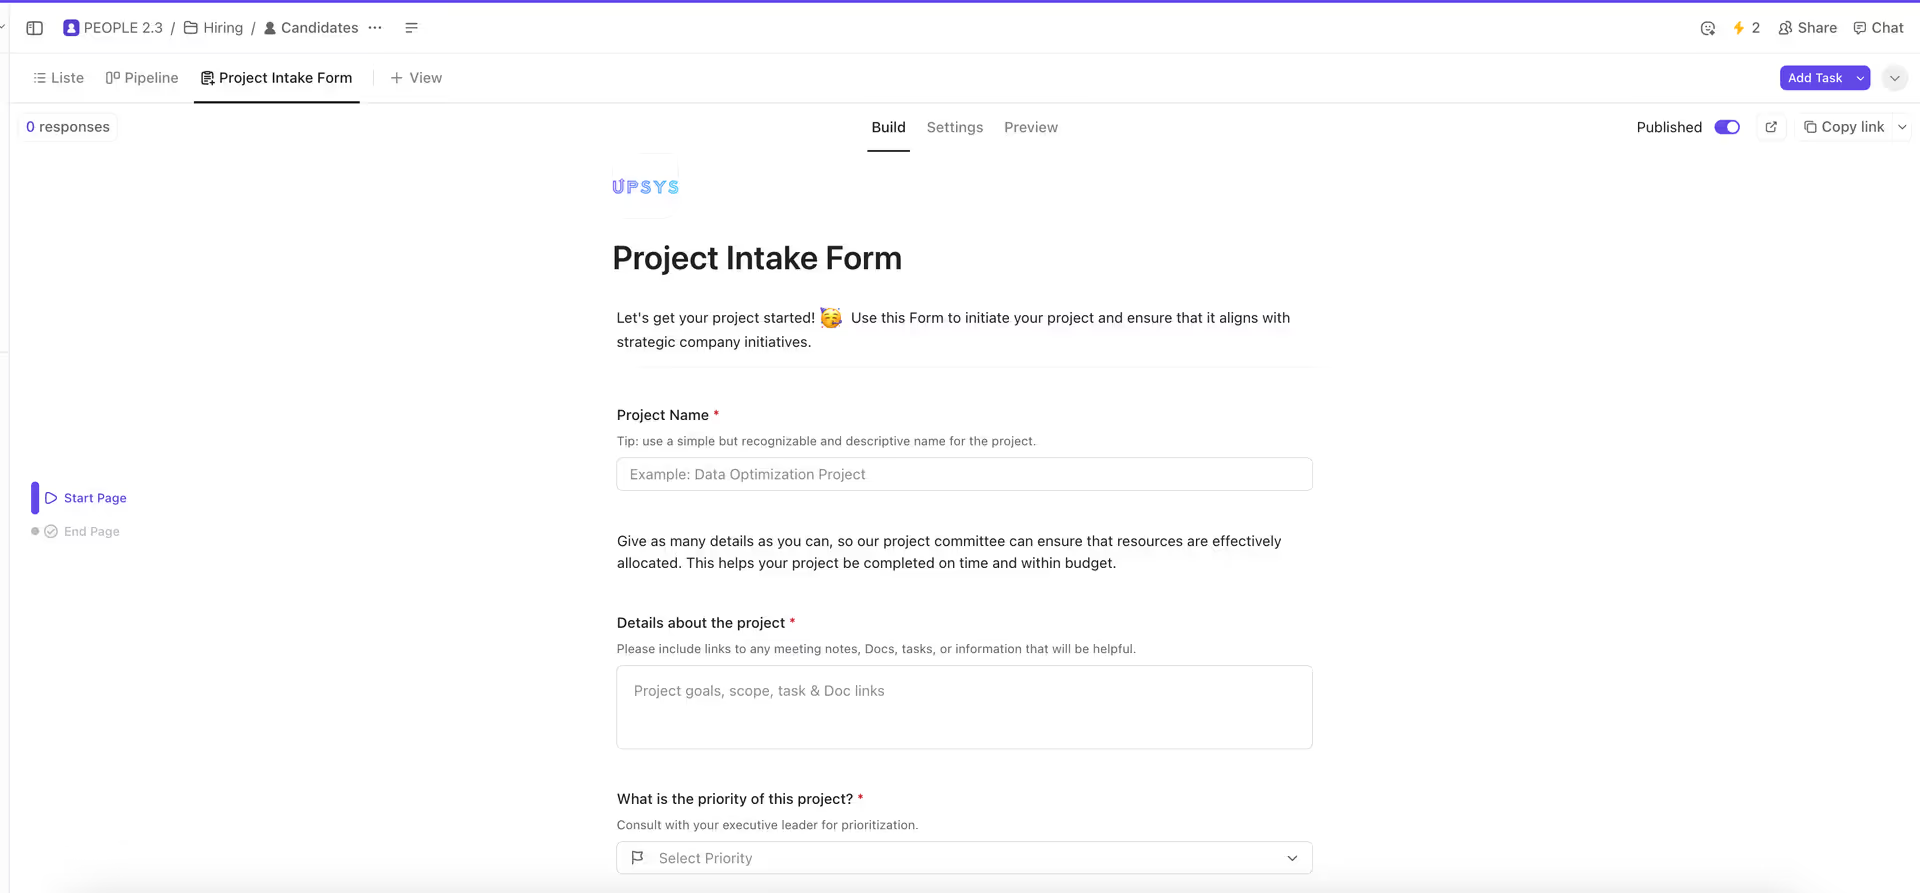
An example of a structured ClickUp form
Types of Form Field
ClickUp supports all the field types you need to build forms for any use case. You can select a mix of built-in ClickUp task fields and custom field types when creating your form.
Built-In Task Fields
These fields automatically maps form data to matching task values. Common built-in fields include:
- Task Name
- Task Description
- Assignee
- Status
- Priority
- Start Date
- Due Date
- Tags
- Attachments
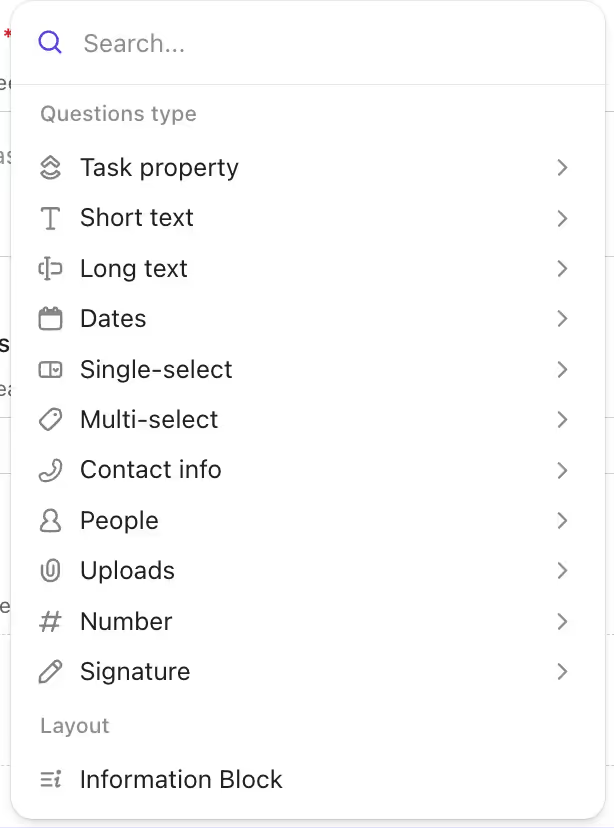
Built-in Task Fields
Custom Field Types
Custom fields let you tailor forms to your needs. This captures any additional information required for your workflow. Available custom field types include:
- Short text
- Long text
- Dates
- Single-select
- Multi-select
- Contact info
- People
- Uploads
- Number
- Signature
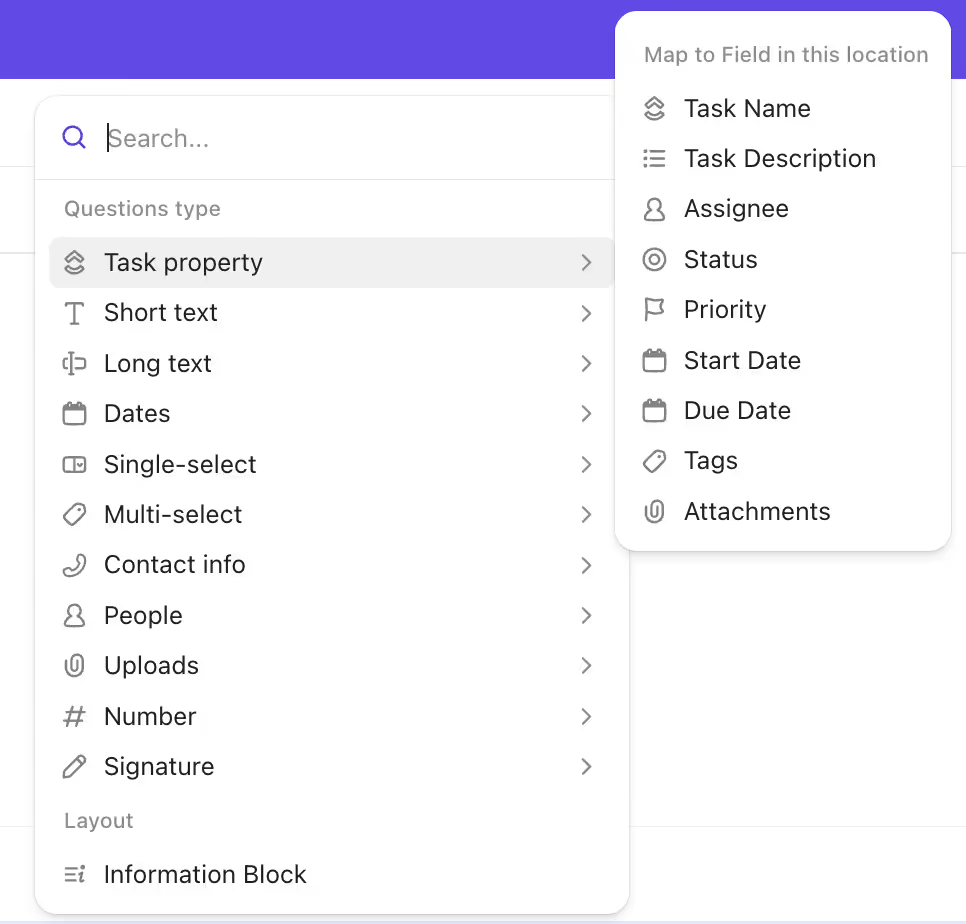
Custom Field Types
Step 3: Add Conditional Logic or Hide Fields (Optional)
ClickUp forms support basic conditional logic to show or hide fields based on previous answers. To do this:
- Click on a field that will trigger conditions.
- Select the "Logic" option.
- Create your condition.
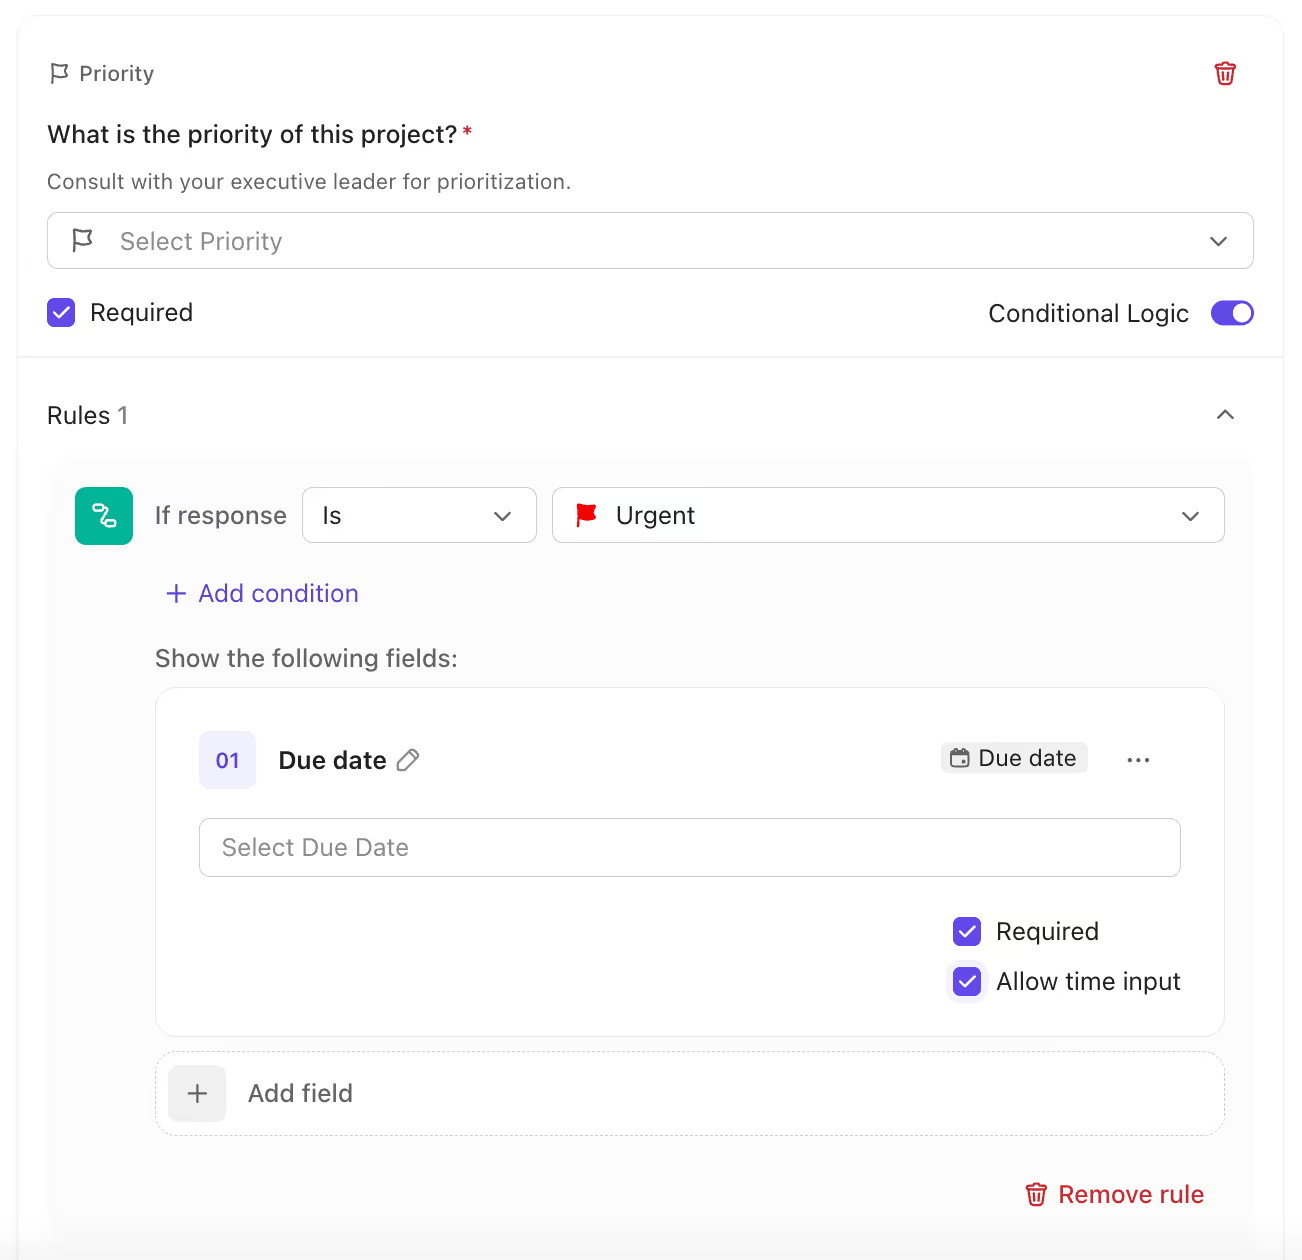
Conditional logic
ClickUp Forms also allows you to hide specific fields from respondents. Hidden fields are especially useful when you want to pre-populate certain values or keep internal data out of view. To set a field as hidden in your ClickUp Form:
- Click on the field you want to hide.
- Look for the “Hide question from form” toggle in the field settings panel.
- Enable the setting. The field will now be hidden from anyone filling out the form.
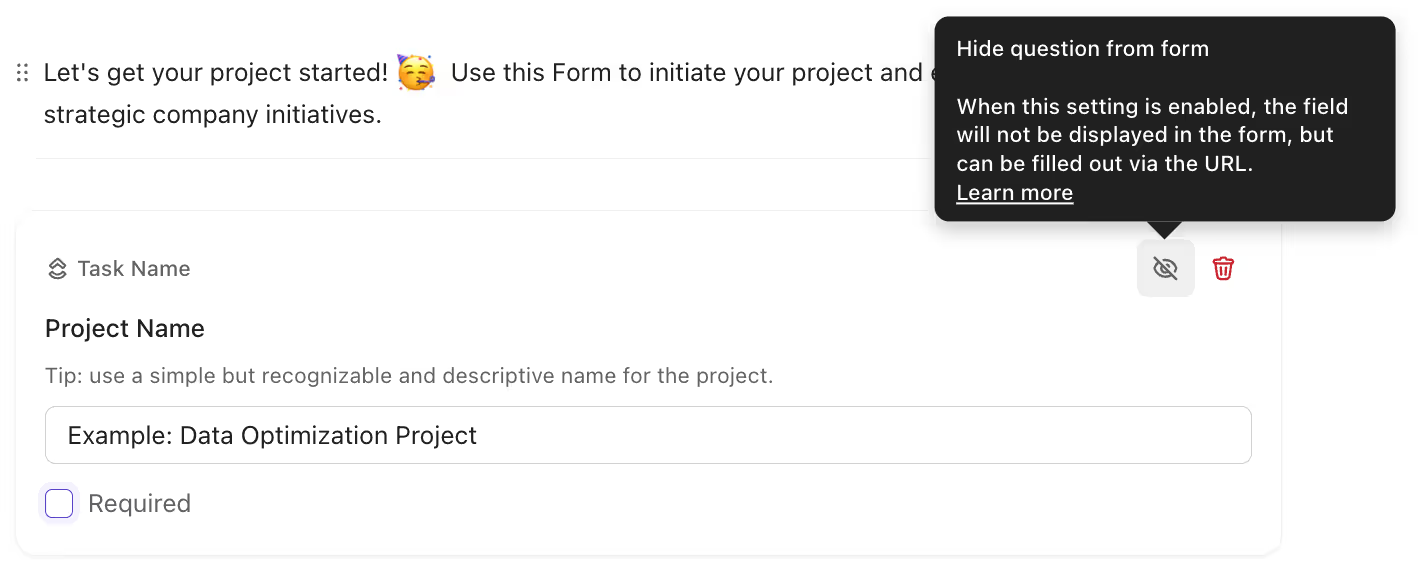
Hide form questions
Step 4: Configure Form Settings
Before publishing, configure additional settings such as:
- Create task in: Automatically adds the form response in the selected list.
- Assign tasks to: Automatically assign form tasks to specific team members based on responses.
- Apply a template: Apply templates to standardize incoming tasks.
- Redirect URL: Specify where users go after submission.
- Button label: Change the "Submit" button text.
- Add custom field answers to the task description: All responses from custom fields are automatically included in the description of the task.
- Show resubmit button: Displays a “Resubmit” button after someone completes the form. This allows users to submit the form multiple times without needing to reload the page or reopen the form link.
- Hide ClickUp Branding: (Available on Business plans and above).
- Show reCAPTCHA: Prevent spam submissions.
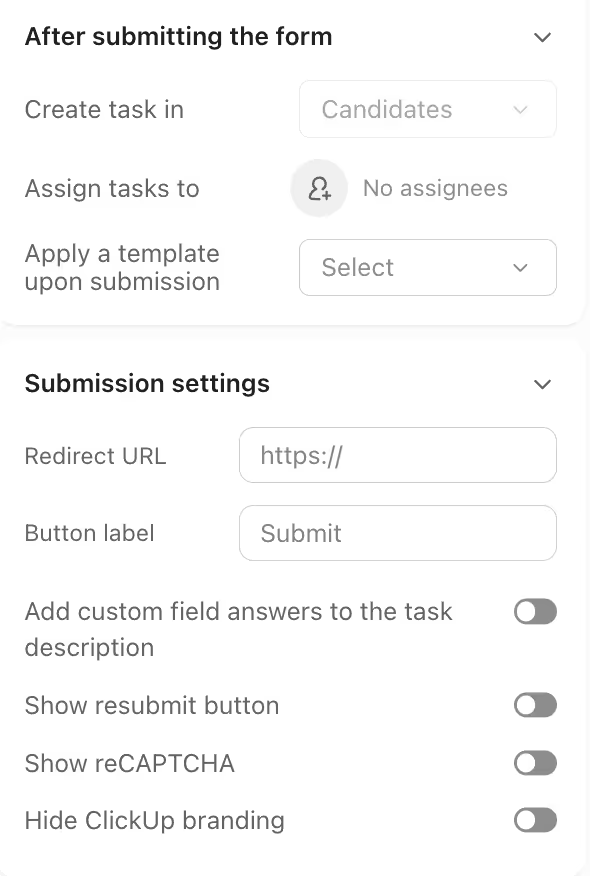
Form Settings
Step 5: Customize Form Design
ClickUp Forms offer a range of design options to help you create on-brand forms. Here are key customization features you can use:
- Layout: Choose between a single-column or two-column layout.
- Theme: Select between light and dark themes to match your brand or website style.
- Background: Set a custom background color or image to reinforce your brand identity.
- Button Colors: Customize the color of your form’s buttons to align with your brand.
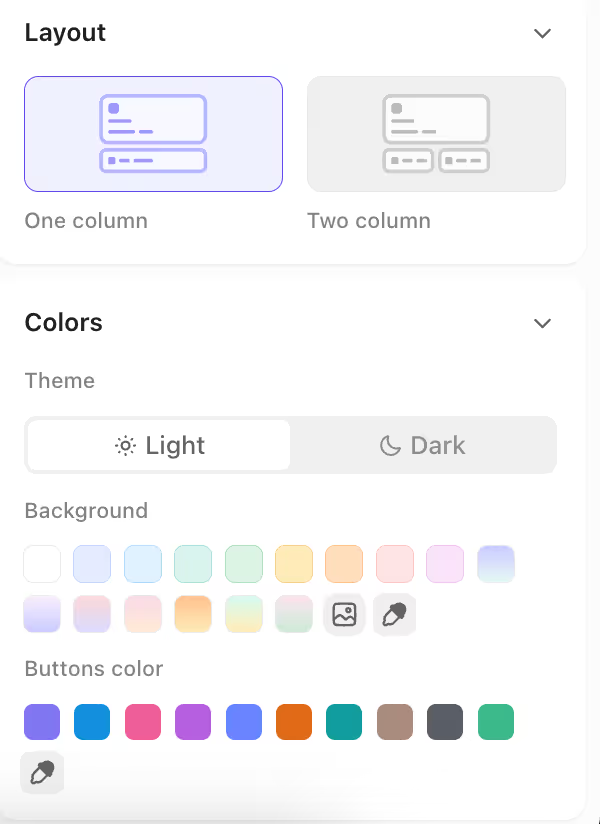
Customize how your form looks
Step 6: Share Your Form
ClickUp's form sharing capabilities extend to both internal collaboration and external sharing. Once ready, you can make forms accessible. ClickUp offers two sharing options:
- Copy Link: Get a shareable URL for your form
- Embed Code: Copy HTML code to embed the form on your website
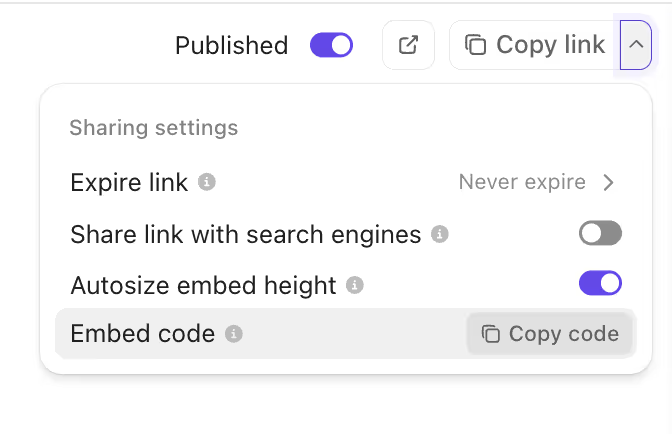
Copy embed code to add on a website
Analyzing Responses
Analyzing responses is simplified and insightful. Here are the methods available:
- Exporting Data to CSV: Easily export all form data into a spreadsheet for filtering, parsing, and in-depth analysis. Use ClickUp to Sheets to automate exporting your form data directly into Google Sheets for real-time updates and streamlined reporting.
- Creating Tasks: Convert form submissions into actionable tasks assigned to your team. Add labels, statuses, and dates to simplify workflow.
- Adding Responses to Tasks: Insert submission details and field data directly into task descriptions, adding useful context. This is especially helpful for survey creation where understanding the nuances of each response is important.
- Searching and Organizing: Leverage ClickUp's robust search and filters to quickly find and organize relevant tasks based on form response info.
Advanced ClickUp Form Automations
What truly sets ClickUp Forms apart is their integration with ClickUp's automations to auto-route tasks, apply templates, and assign ownership. Some automations you can apply are:
Auto-Routing Tasks to the Different Lists
You can use custom dropdown fields to determine which list a task should go to. For example:
- Dropdown Field: “Department”
- Marketing → route task to Blog Articles list
- Finance → route to Finance list
- Operations → route to Operations list
Use the automation:
"When task is created AND custom field X = value → move to list Y"
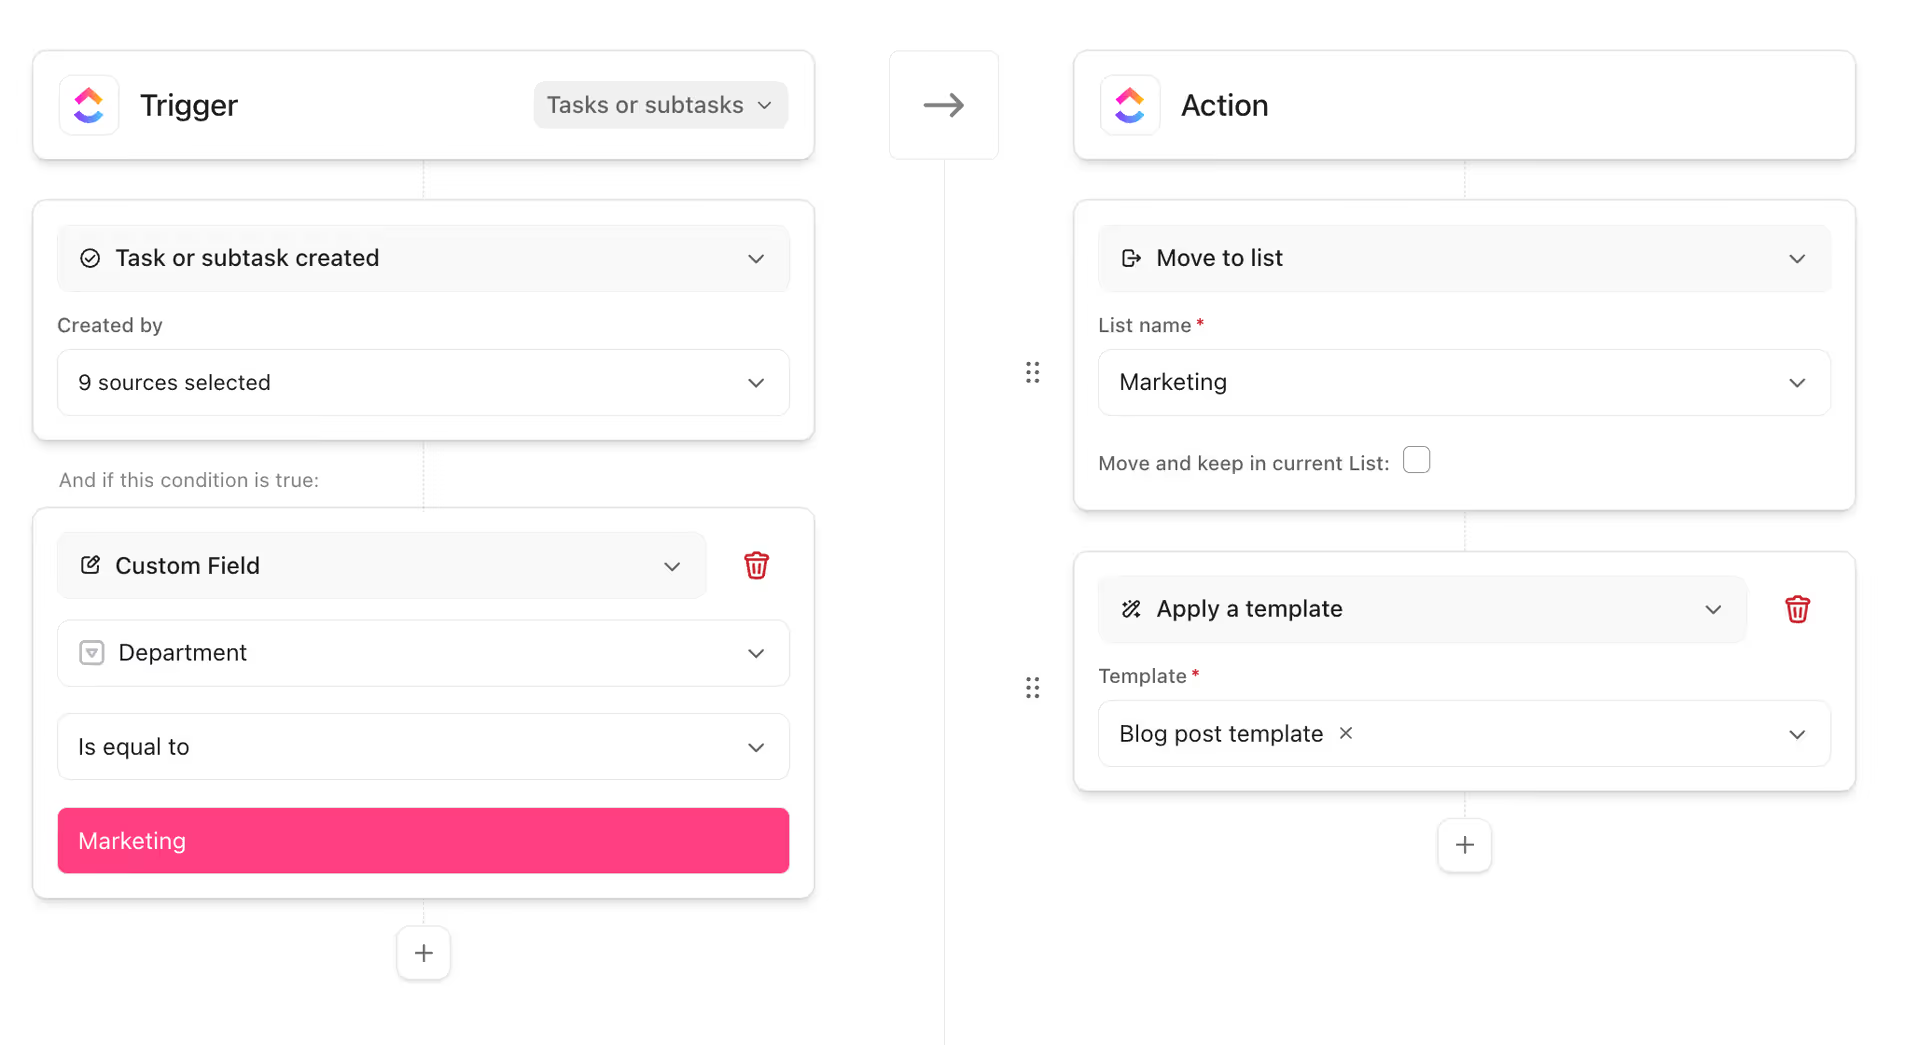
Auto-route tasks to different list automation
Applying Specific Templates Based on Request Type
We can make this workflow even more powerful by adding another action to our automation. After the "Move to List" action, we add a second action.
Add the second action:
"Apply a Template" and select your "Blog Post Template."
Now, not only is the task moved to the right list, but it also arrives pre-populated with your entire blogging workflow.
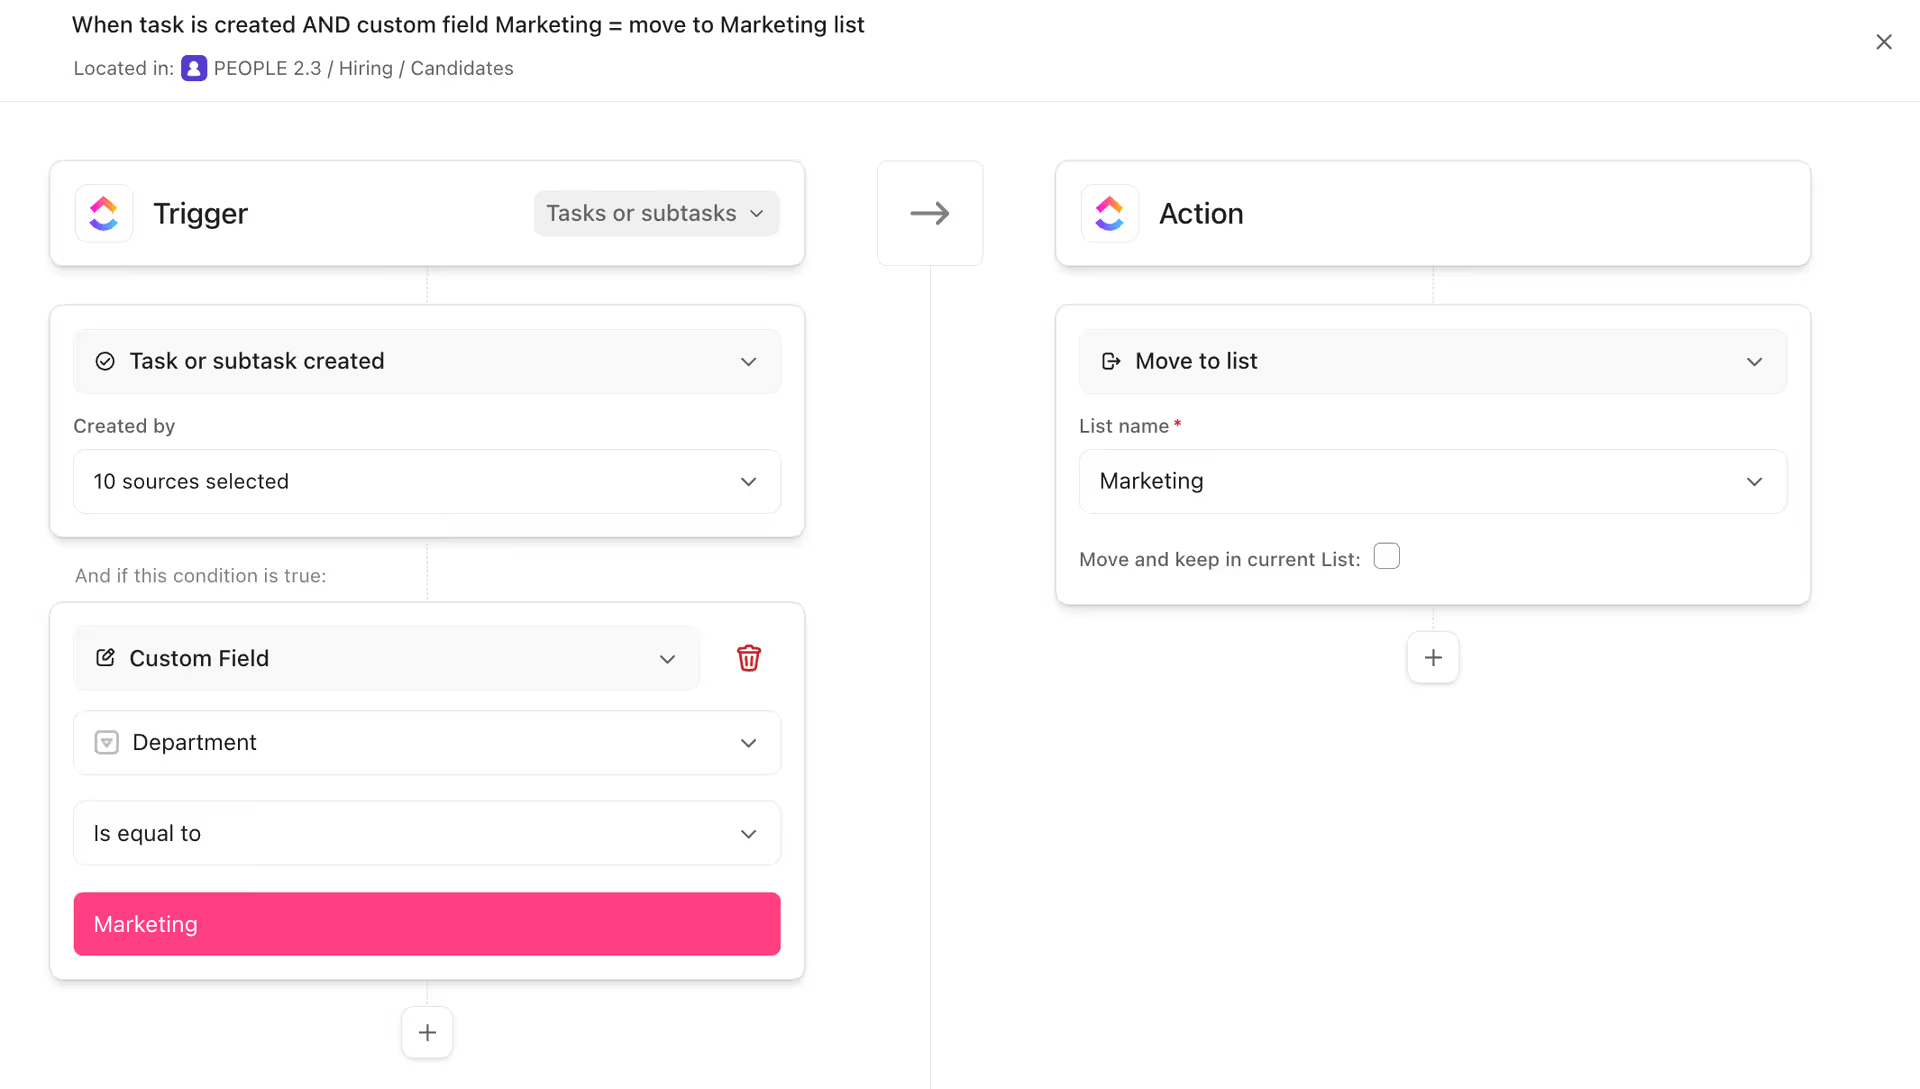
Apply specific template based on request
Integrating External Form Tools with ClickUp
While ClickUp forms are powerful on their own, integrating them with other tools can further enhance your workflow. For complex form needs, connect these specialized form tools to ClickUp:
- Use Make.com: Create workflows that send form submissions from tools like Tally, Typeform, or Google Forms into ClickUp as tasks.
- Leverage Zapier: Build simple automations that connect form tools to ClickUp without coding.
- Utilize Native Integrations: Some tools like JotForm offer direct ClickUp integration.
Best Practices for ClickUp Form Implementation
To maximize the effectiveness of your ClickUp forms, consider these best practices:
Form Design Principles
- Keep Forms Focused: Include only essential fields to increase completion rates.
- Use Clear Field Labels: Make sure users understand exactly what information to provide.
- Apply Conditional Logic: Show fields only when relevant to the user's previous responses.
- Add Helpful Instructions: Include field descriptions for any potentially confusing inputs.
- Match Field Types to Data Needs: Use appropriate field types (text, numbers, dates, etc.).
Implementation Strategy
- Create Forms at the List Level: Always create forms directly in the list where tasks should appear.
- Use Templates with Forms: Apply templates to standardize task structure for incoming requests.
- Consider a Central Intake List: For complex routing needs, use a dedicated intake list with automations.
- Test Before Sharing: Submit test entries to verify your form and automations work as expected.
- Document Your Form URLs: Keep track of all published forms for future reference or updates.
Optimization Techniques
- Reuse Custom Fields: When adding fields to forms, use existing workspace custom fields rather than creating new ones.
- Turn On "Custom Field Answers to Description": Makes form responses visible in the task description for easier review.
- Apply Recaptcha for Public Forms: Prevent spam submissions when sharing forms publicly.
- Set Expiration Dates: For temporary intake needs, set forms to expire automatically.
- Monitor Form Effectiveness: Review the quality of submissions and adjust forms as needed.
Real-World Use Cases For Forms in ClickUp
ClickUp forms are very flexible and useful across many business needs. Here are some real-life scenarios where they can be incredibly handy:
Client Feedback Forms
If you want to hear directly from your clients about their experiences with your products or services. ClickUp forms provide an easy way for your clients to share their thoughts, reviews, and testimonials. It's like having a direct line to your customers' insights.
Internal Request Forms
There are often internal requests at like IT support, HR inquiries, or legal matters at workplaces. ClickUp forms can be customized to create efficient channels for these requests. It's like having dedicated inboxes for different departments to ensure smooth operations.
Event Registration Forms
If you're planning events like conferences, webinars, or workshops, you know how hectic it can be to manage registrations and track attendees. ClickUp event registration forms simplify this process. It's like having a personal assistant handling RSVPs, collecting attendee details, and managing payments - event management made easy.
Lead Generation Forms
In marketing and sales, finding potential customers (leads) is important for growth. ClickUp forms can be tailored into lead generation forms that act like virtual nets, capturing information from various sources like website landing pages, ads, or property listings. This allows expanding your customer base and increasing revenue effectively.
Conclusion and Recommendations
ClickUp's built-in forms provide great value by simplifying data collection and turning passive form data into actionable tasks. With multiple form options, conditional logic, task automation, and design customization, ClickUp forms can optimize workflows across sales, marketing, HR, and support—any department.
UpSys Support for ClickUp
At UpSys, we specialize in helping teams optimize their project management processes using ClickUp. Whether you are considering adopting ClickUp or looking to maximize its potential for your team, our expertise in setup, consulting, coaching, and training will ensure you get the most out of this versatile tool. Contact us to learn how we can tailor ClickUp to fit your team's unique needs and propel your project management to new heights.
