
Introduction to ClickUp Views
ClickUp is one of the most versatile project management platforms. With its customizable views and workflows, ClickUp can adapt to suit any team's needs. One of the most powerful features of ClickUp is its wide range of task views.
In ClickUp, a "view" refers to the way you can visualize your tasks and projects. ClickUp Views are customizable, allowing you to customize your workspace to suit your specific needs and preferences.
In this intro to views, we'll talk about all task views offered by ClickUp. We'll cover the basics of each view and how you can use them for better team collaboration.
ClickUp Task Views
Key Takeaways:
- ClickUp offers a wide range of customizable task views.
- Each view caters to different team needs and work styles.
- Using the right views can boost team productivity, collaboration, and workflow organization.
- You can customize views through grouping, filtering and displaying tasks in different ways.
Different Task Views Available in ClickUp
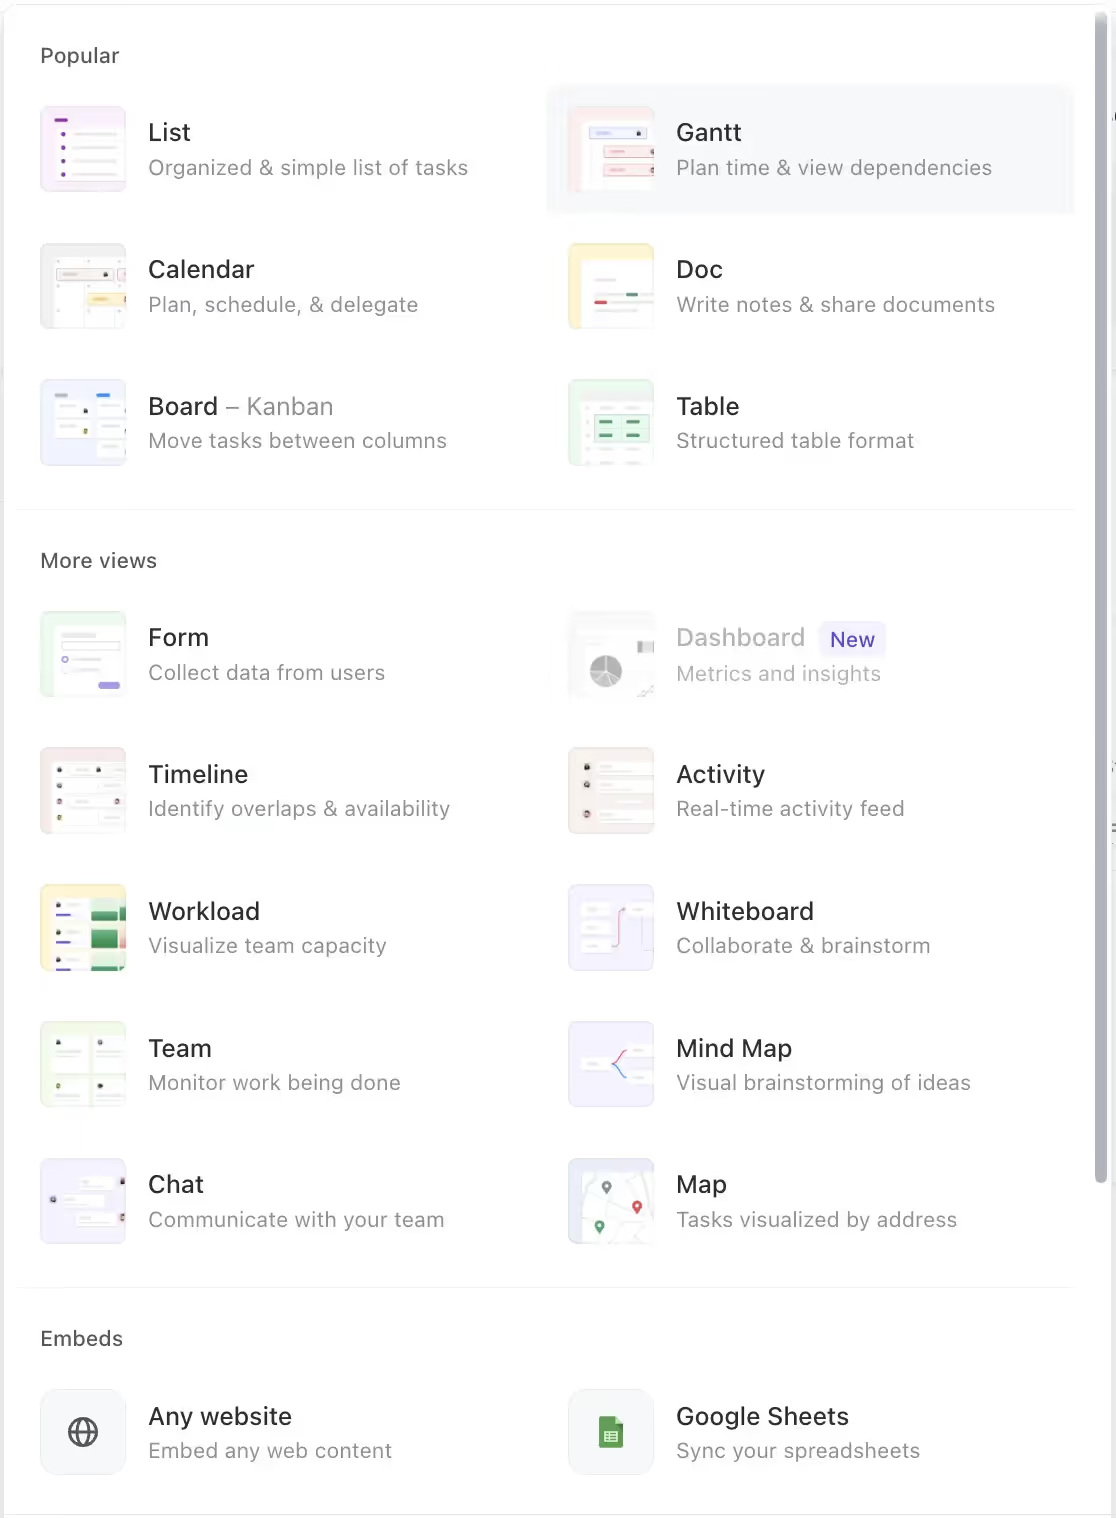
ClickUp offers over a dozen customizable task views, including List, Board, Calendar, Gantt, Timeline, Workload, Table, Team, Mind Map, and collaborative views like Docs, Chat, and Whiteboards. These views cater to different team needs and enable efficient task visualization, scheduling, data analysis, and real-time collaboration.
Core Task Views for Project Management
ClickUp offers several core task views that provide a simple yet powerful way to manage your work. These include the List, Board, and Calendar views.
The main view: List View
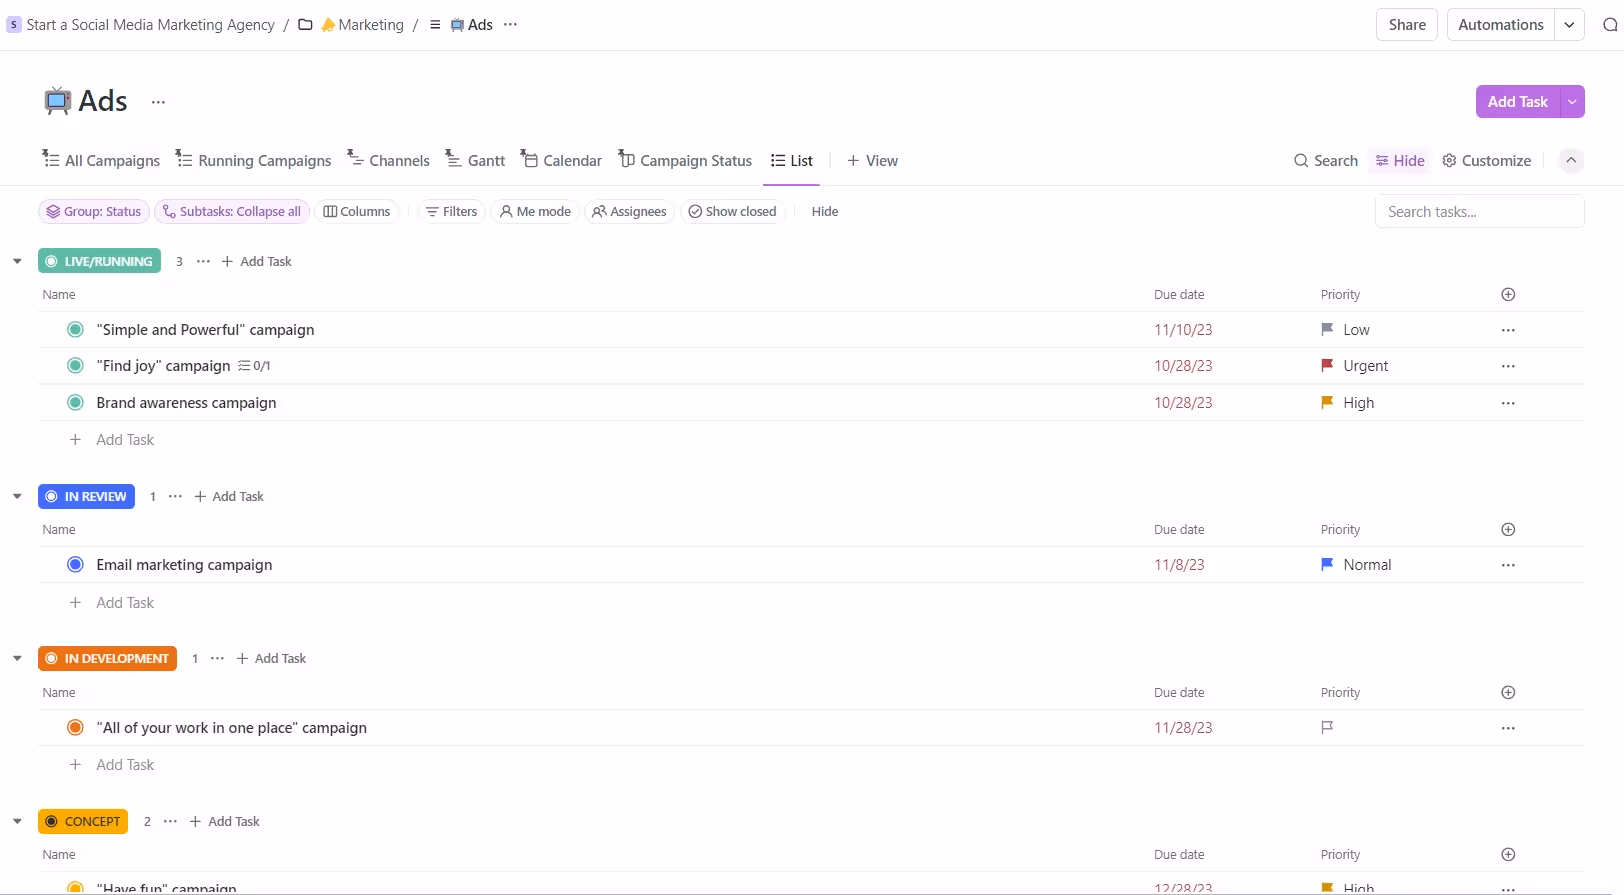
ClickUp's List View is the default view
ClickUp List View is the default and most flexible view. List View displays your tasks in a list format that is easy to scan and work with. It's perfect for linear thinkers who prefer a straightforward approach to task management. List view is required for every Space, Folder, and List in ClickUp.
List View comes with features that simplify task management:
- Group tasks by categories like status or date, and sort them accordingly.
- Find tasks using filters for the assignee, status, date, priority, etc., including custom fields.
- Modify columns, adjust widths, and create columns for custom data display.
- Simply click view to see the detailed task list.
Use it for: Task prioritization, project tracking.
Board View

Board View is based on Kanban Methodology
Inspired by the Kanban methodology, the Board view displays your tasks as cards on a board. This view is ideal for teams that follow agile methodologies or anyone who prefers a step-based representation of their tasks. ClickUp's Board View displays tasks with statuses represented as columns. It works similarly to Trello boards and is perfect for teams using Agile frameworks like Scrum and Kanban.
Here are some key features of Board View:
- Drag-and-drop tasks between columns to update their status.
- Custom statuses can be created to match your workflow.
- Filter tasks and group columns to create multiple Board Views.
- View attachments, comments, and checklists right on the card.
- See task properties like assignees, due dates, priorities, etc.
Use it for: Visual project management, workflow tracking, team collaboration.
Calendar View
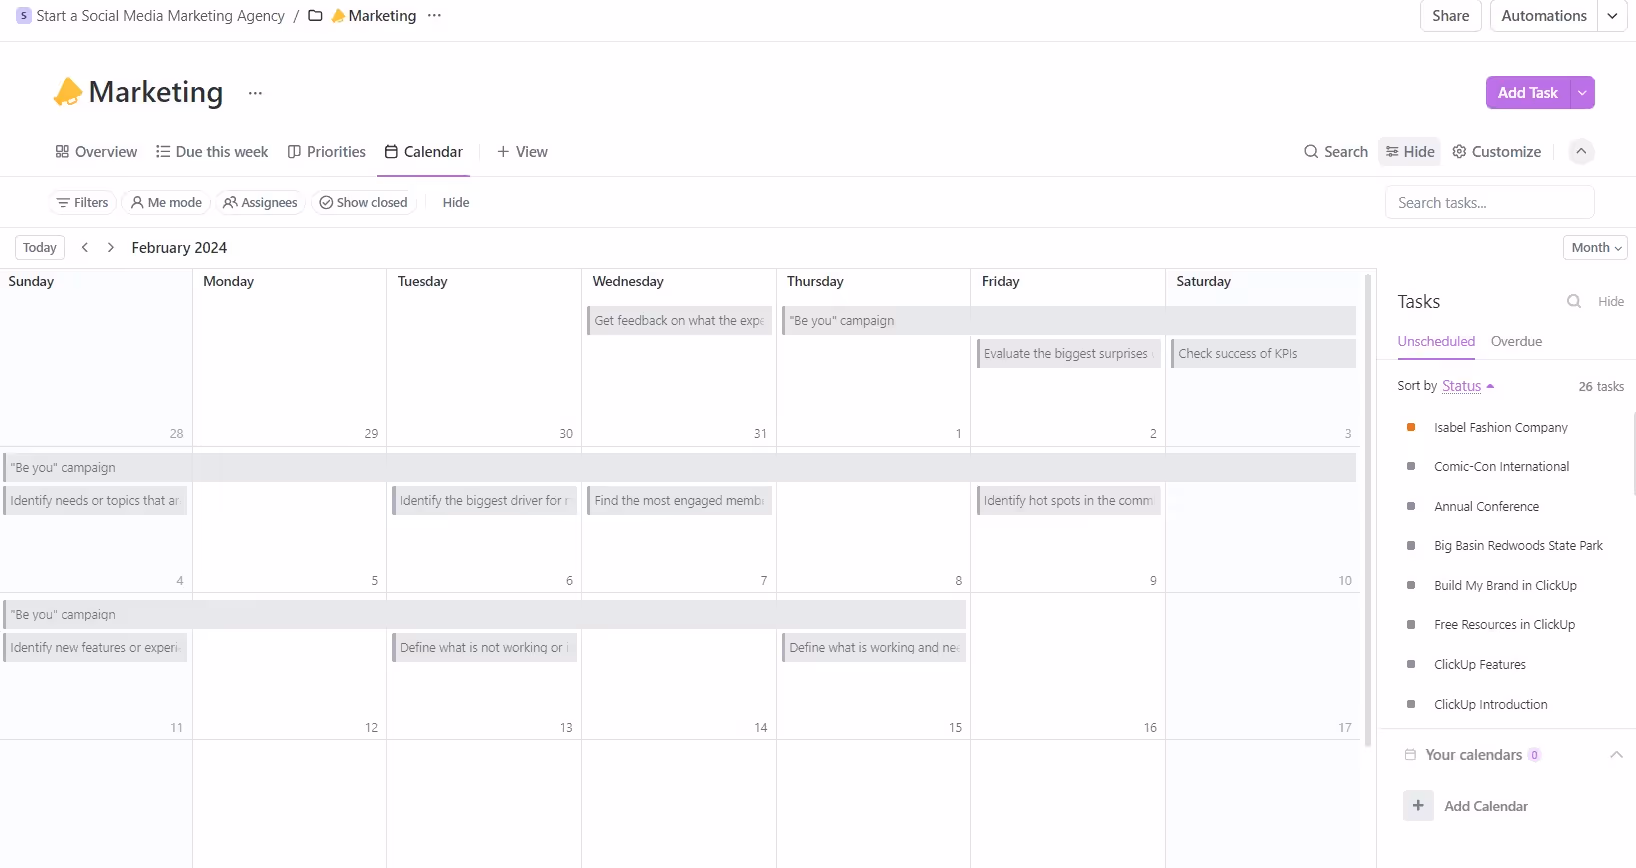
Calendar View is perfect for keeping track of deadlines
This view is perfect for keeping track of deadlines and understanding your schedule. It allows for planning, scheduling, and even resource management. You can drag and drop tasks, customize and categorize tasks, and even sync them with other calendars.
Calendar View offers several features:
- Adjust zoom levels from months down to minutes.
- Set working hours and non-working days.
- Share your calendar or export as .ics files.
- Change calendar orientation and styles.
- View multiple calendars together.
Use it for: Content management, event planning.
Advanced Task Views in ClickUp
For those who need deep insights into their tasks and projects, ClickUp offers a range of advanced task views. These include Gantt, Table, Timeline, Workload, Team, Activity, Mind Map, and Map views.
Gantt View
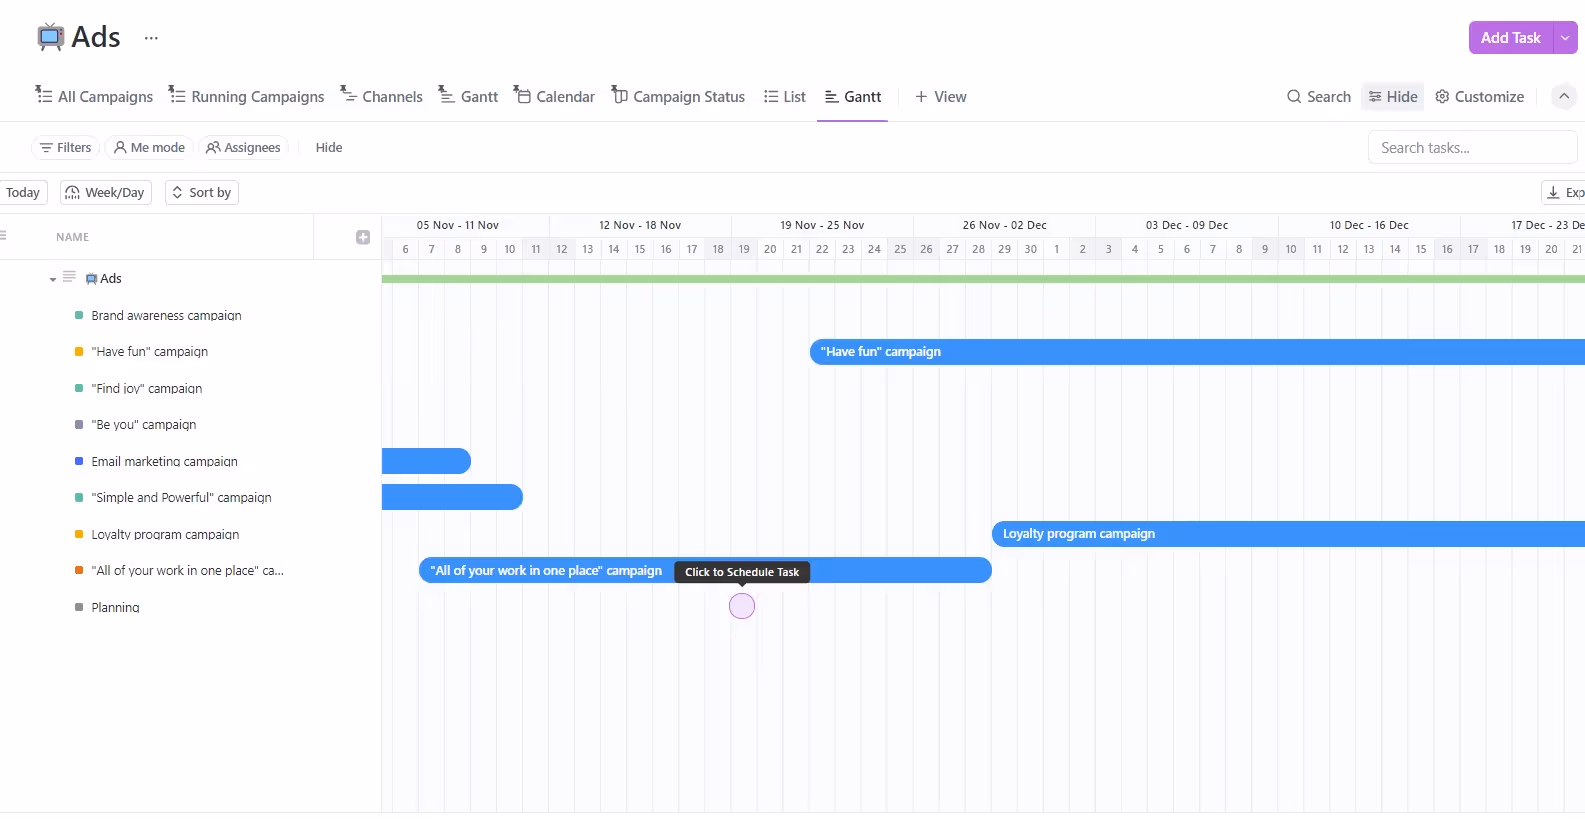
Gantt View is one of ClickUp's Advanced Task Views
ClickUp Gantt view provides a timeline of your tasks, milestones, and overall project schedule. This view is perfect for managing projects with complex dependencies between tasks. The Gantt view also allows you to set milestones, making it easier to keep track of important deadlines and goals. You have the option to create a Gantt view for individual projects or establish a Gantt view at the Space or Folder level to simultaneously track multiple projects.
Key features of the Gantt view:
- Visualize project timelines and deadlines.
- Link tasks to understand order and impact.
- Track task completion and project milestones.
- Assign and manage team workload.
- Adjust the timeline, zoom levels, and display options.
Use Gantt view for: Overseeing complex projects, planning dependencies.
Table View
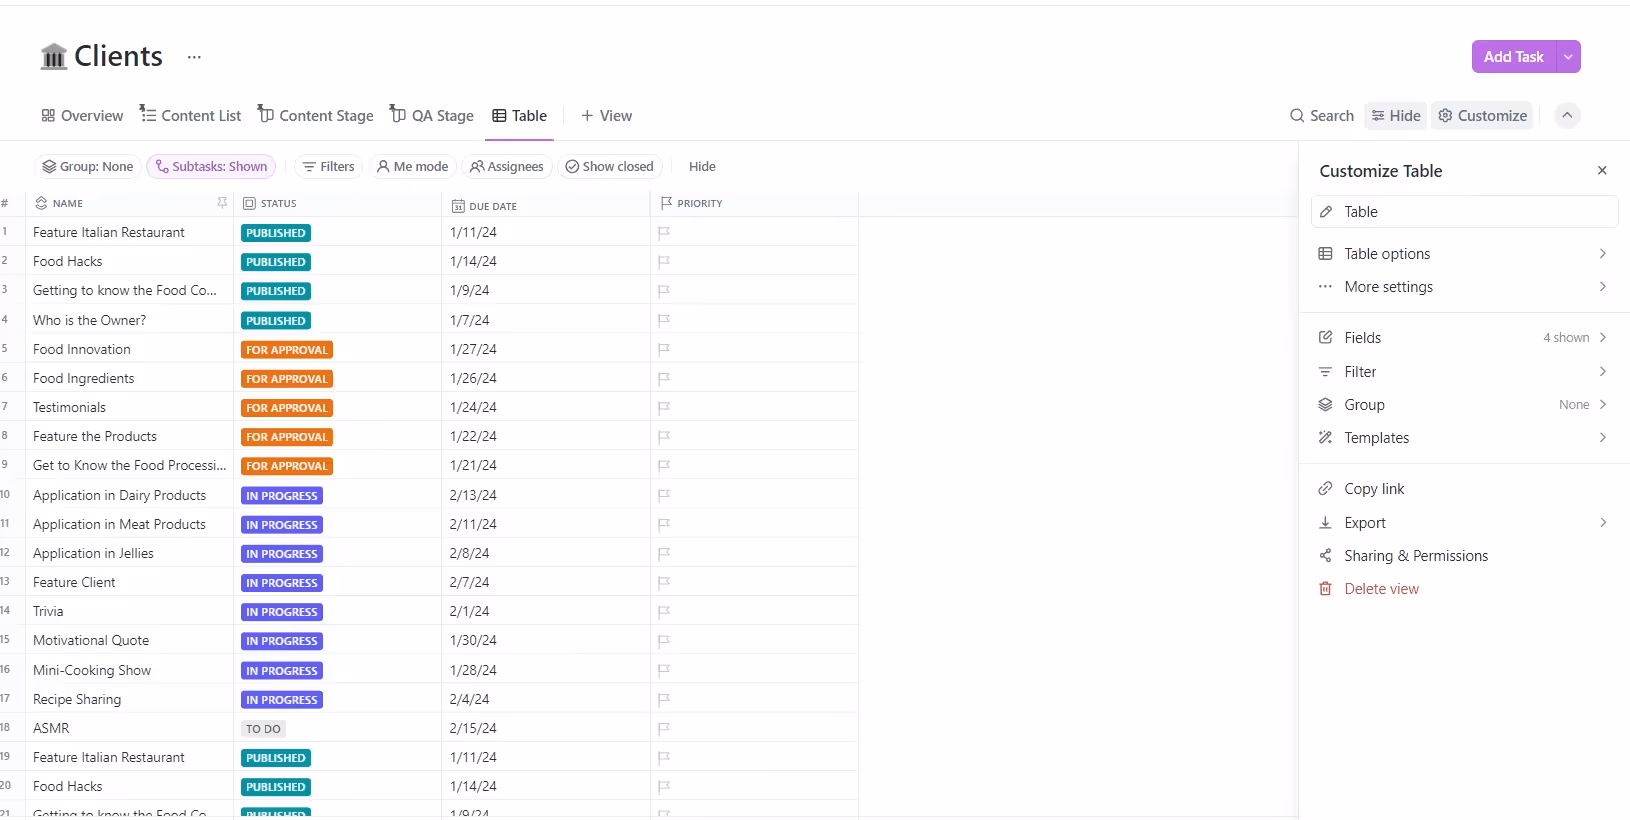
Table View is similar to a spreadsheet
The Table view in ClickUp presents your tasks in a spreadsheet-like format, allowing for detailed task analysis and bulk actions. It's a great tool for managing large amounts of data and can be customized to show only the information you want. Use the filters and search functionality to analyze tasks by parameters like assignee, status, priority, etc.
Table View offers several features:
- Customize columns to display relevant task details.
- Organize tasks by different attributes like status or priority.
- Quickly update task information directly in the table.
- Perform actions on multiple tasks simultaneously.
- Use filters to find specific tasks efficiently.
Use Table view for: Large number of tasks and data editing
Timeline View
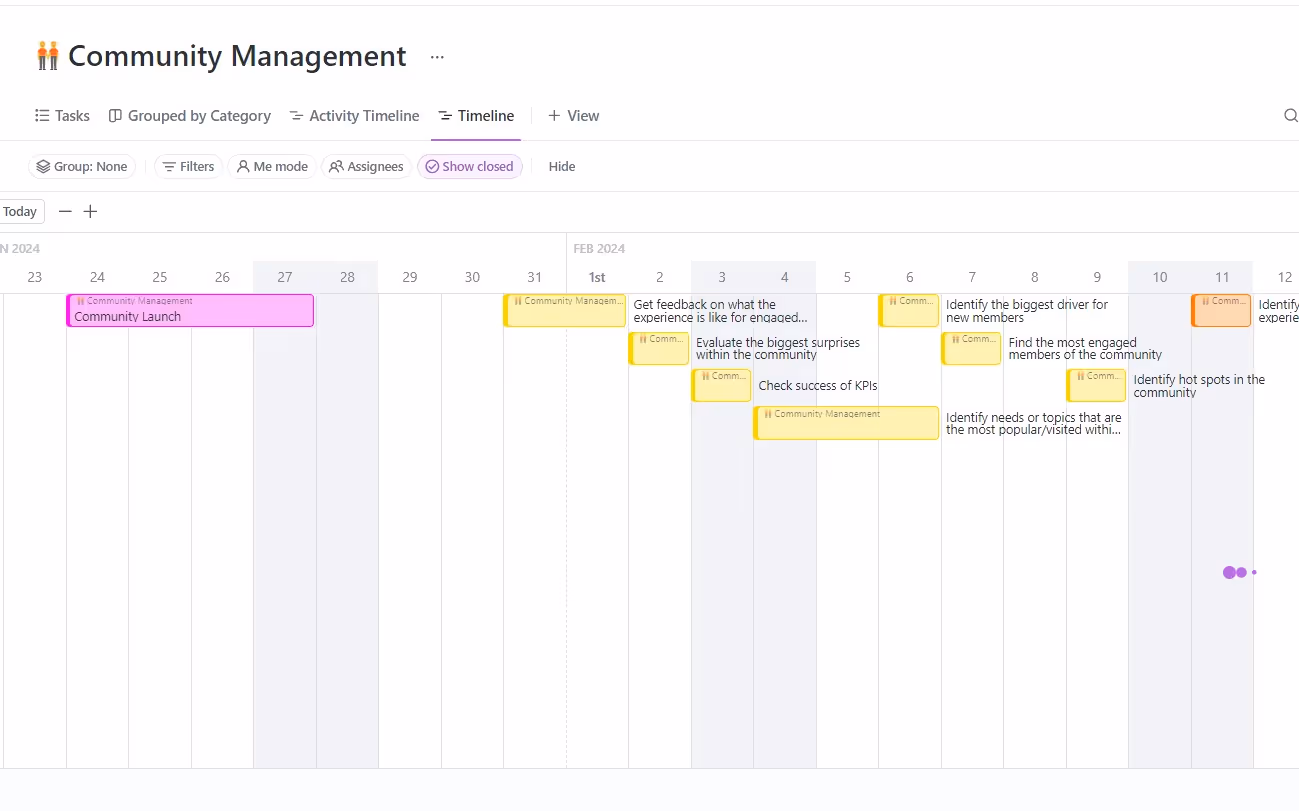
Timeline View shows you a horizontal timeline
ClickUp Timeline view lets you map your team's tasks and schedules on a visually appealing horizontal timeline. This view provides clarity on resource allocation and upcoming deadlines. Just like in a Gantt chart, you can see task durations and milestones mapped on the timeline. The horizontal orientation makes the Timeline view ideal for planning and scheduling.
It has the following features:
- Display tasks along a chronological timeline.
- Easily adjust task dates and durations.
- Identify and manage key project milestones.
- View and manage team members' schedules.
- Customize the view to focus on days, weeks, or months.
Use Timeline view for: Task planning, project planning
Workload View
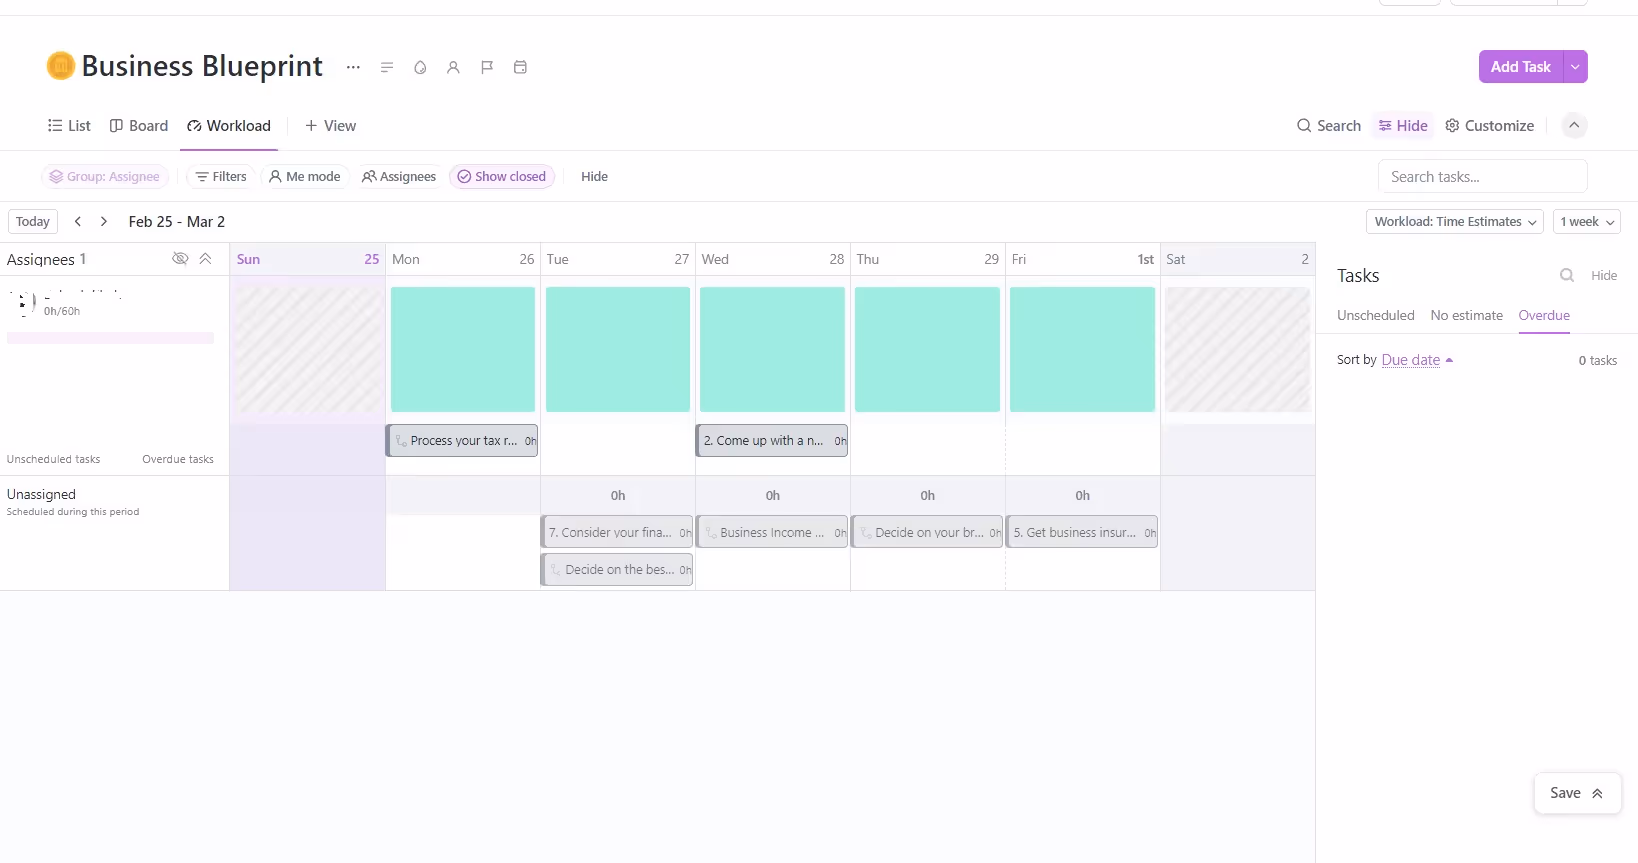
Workload View in ClickUp
The Workload view in ClickUp helps you balance your team's workload by showing how tasks are distributed among team members. It provides a visual representation of each team member's tasks, making it easy to see who is overloaded and who has the capacity for more work. This view is based on the Timeline view and visualizes the amount of work each team member is assigned during the selected period.
Each assignee's workload capacity is visually shown through bar charts. You can see who on your team has availability to take on more work and who is fully booked.
Key Features of Workload View in ClickUp:
- Monitor individual and team workloads.
- View the distribution of tasks across team members.
- Identify and address overburdened team members.
- Reallocate tasks to make sure there's an even distribution.
Use Workload view for: Resource planning and optimization.
Team View
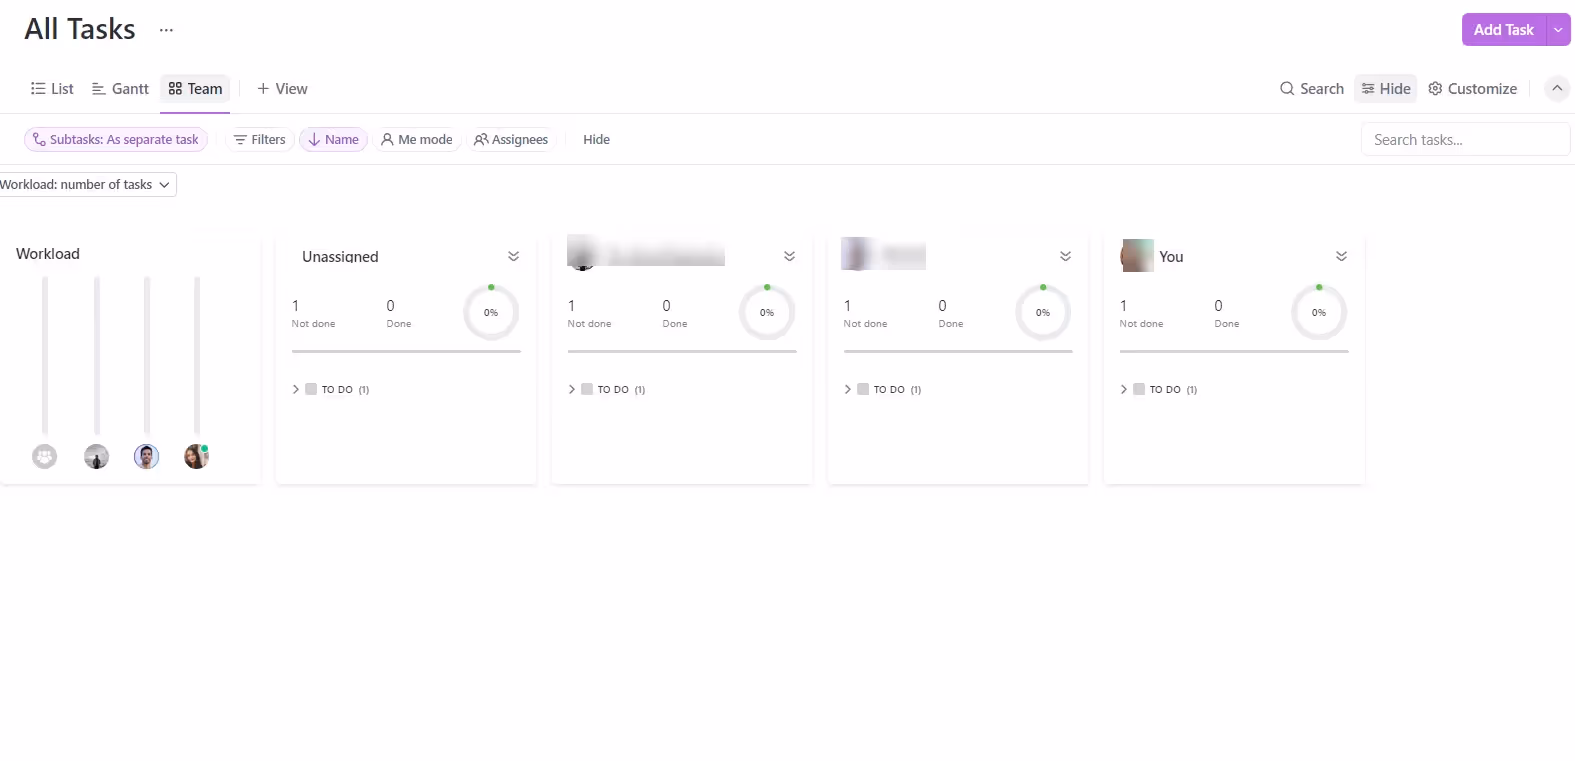
Team View in ClickUp
The team view provides managers with a simplified overview of team members' task workload and progress. The team view provides a high-level overview of your team's workload. It allows you to see what your team is working on, what they've accomplished, and what their capacity is.
It shows what an employee is working on. The team view is a great way to stay in sync with your team's priorities.
With a box representing each assignee, you get a snapshot of:
- Number of tasks assigned
- Tasks completed vs. remaining
- Overdue tasks
- Task priorities
Use Team view for: Team workload tracking.
Map View
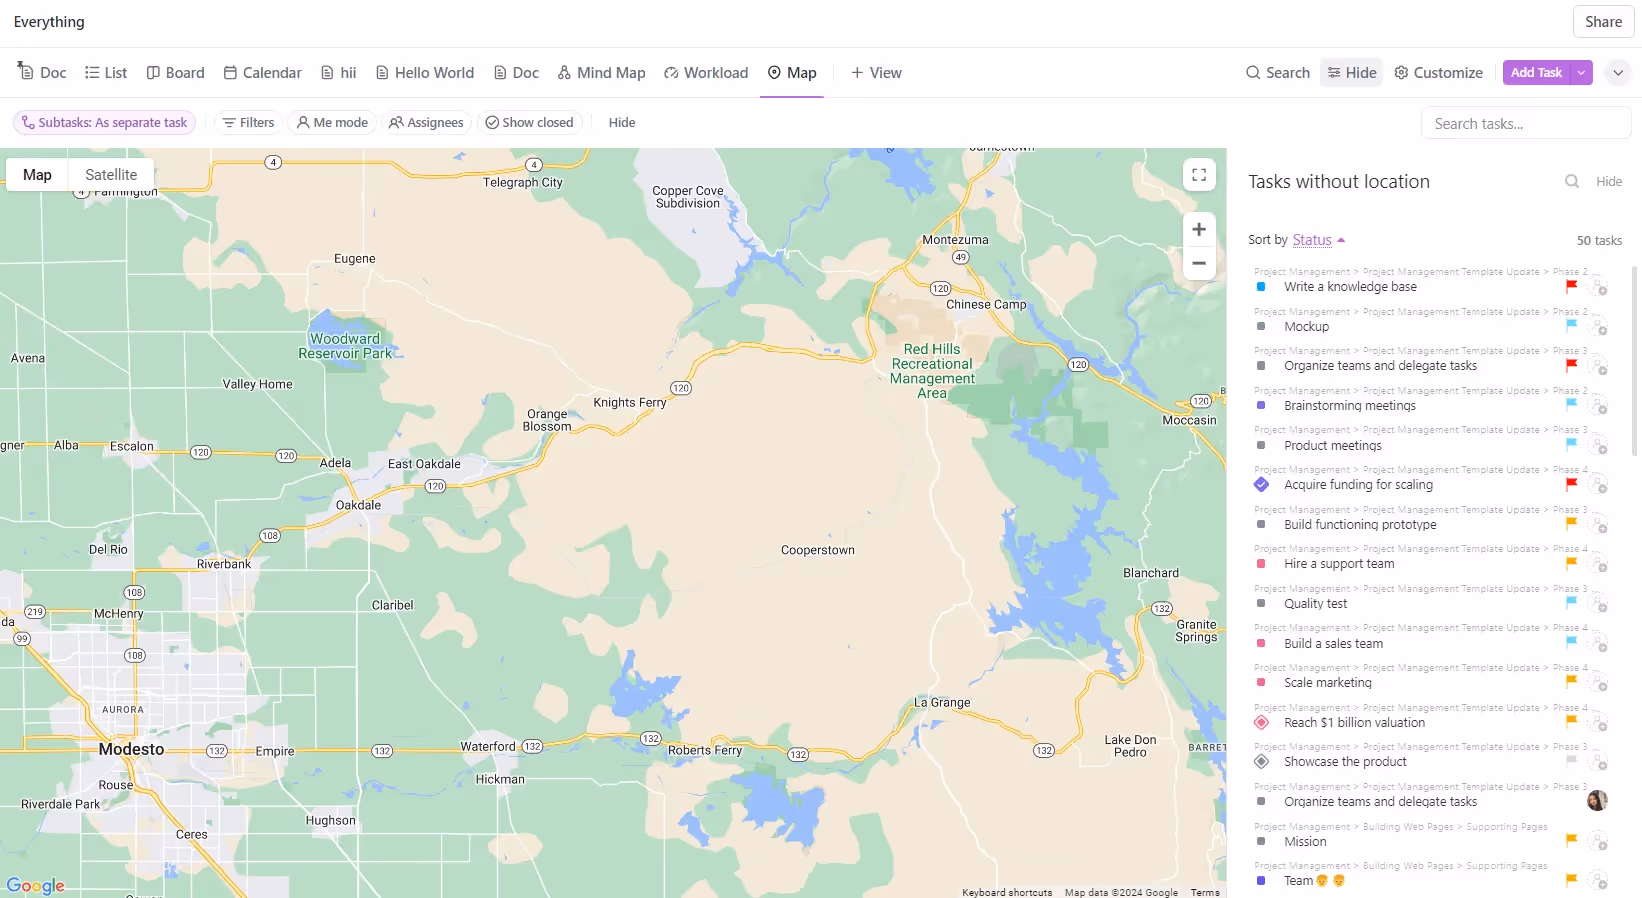
Map View in ClickUp
ClickUp Map view lets you manage tasks that are tied to specific locations. It's perfect for organizing events, tracking job sites, or managing any location-specific workflows. With the Map view, you can visualize location-based work for precise project planning. This view integrates with Google Maps, allowing you to add location fields to your tasks and visualize them on a map.
By integrating location data, you can:
- Visualize task locations on a map
- Assign location-based tasks
- Plan tasks based on geographic proximity
- Optimize routes and itineraries
- Track multi-location projects
Use Map View for: location-based tasks: client meetings, multi-site initiatives...
Collaboration Views for Team Productivity
In addition to task views, ClickUp offers page views that allow real-time collaboration. These include Docs, Chat, Mind Map, Whiteboards, Forms, and Embed views.
Docs View
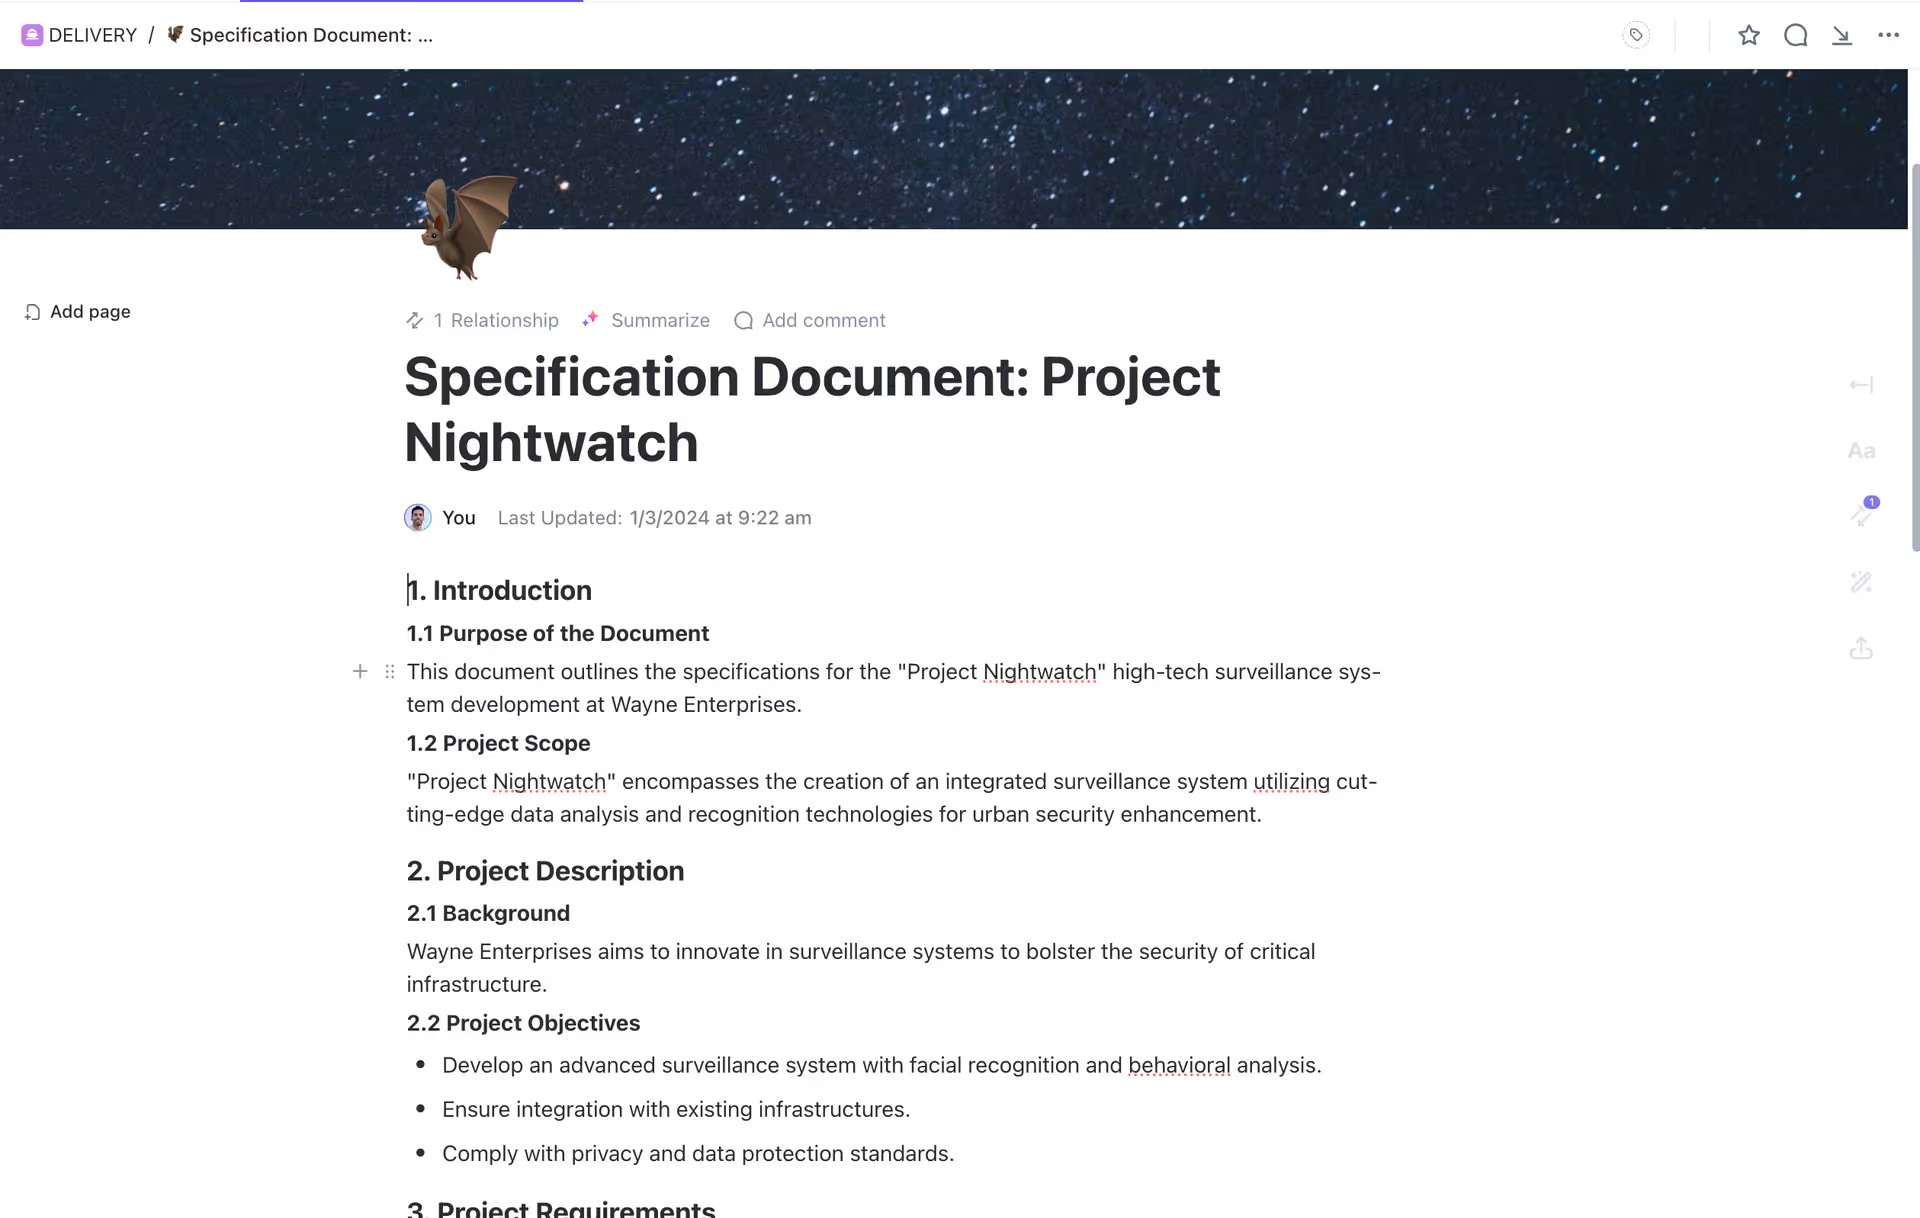
Docs View is one of ClickUp's Collaboration Views
The Docs view allows teams to create beautiful docs, wikis, knowledge bases, and more right within ClickUp. You can connect these docs directly to your workflows to bring ideas to life with your team. You can collaborate in real-time with comments and convert text into trackable tasks.
Key features of ClickUp Docs view include:
- Team members can work on docs together with commenting and task integration
- Give access to docs for non-ClickUp users and control permissions
- Transform doc content into trackable tasks and workflows
- Simplify documentation with reusable view templates
- Revert changes and restore previous versions
Use Docs View for: creating team documentation, knowledge bases, wikis, and collaborative writing.
Mind Map View
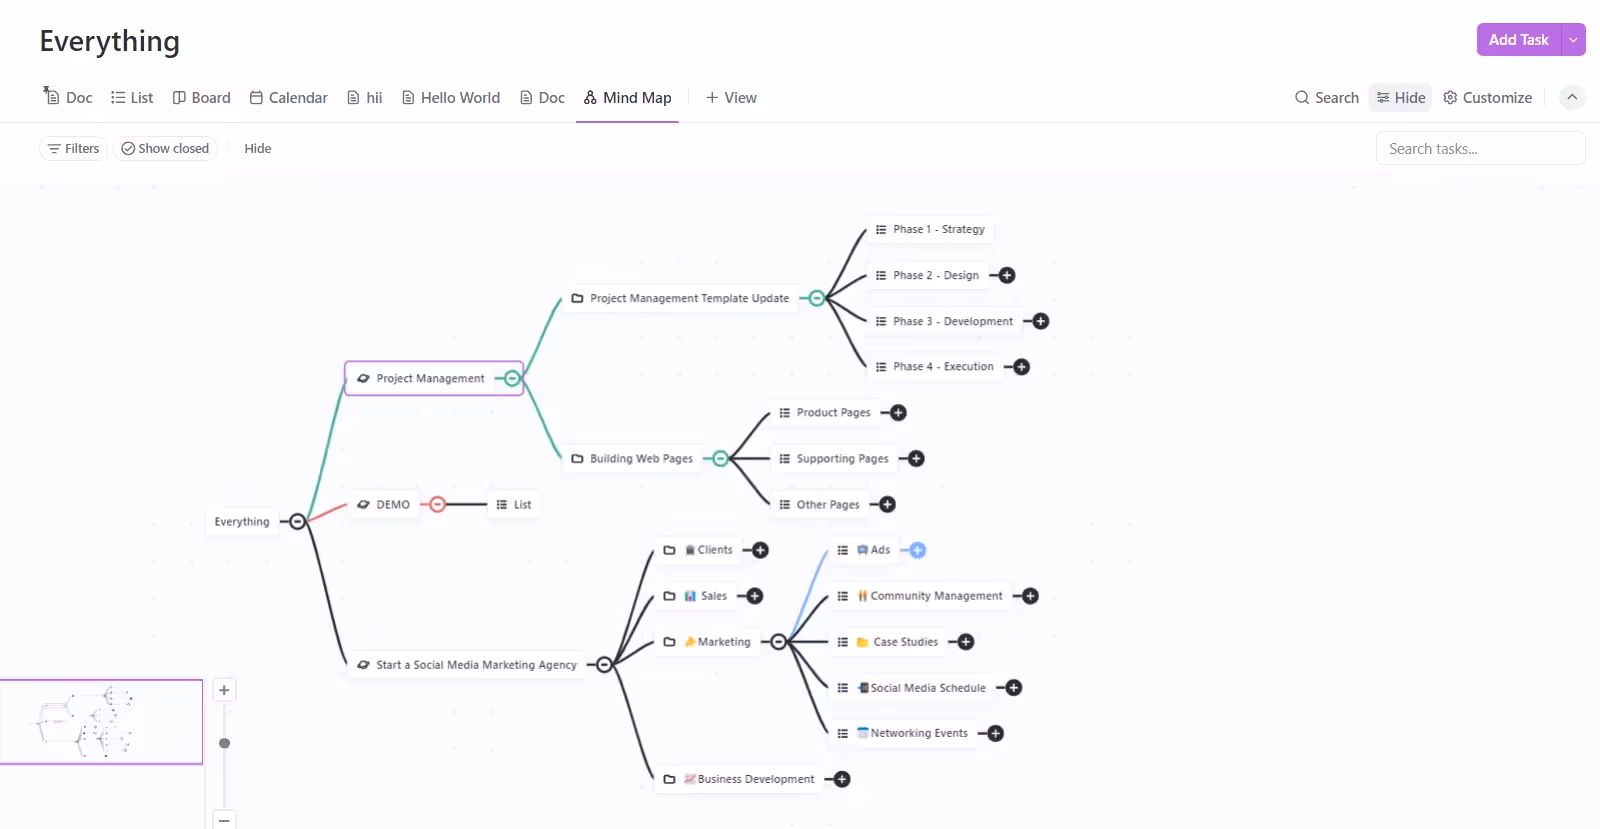
Mind Map View is great for visualizing ideas
The ClickUp Mind Map view is a powerful tool that helps you brainstorm and visualize ideas and how they connect. The Mind Map view lets you logically visualize the relationships between tasks, ideas, and sub-tasks through a node-branch diagram.
With a central parent node and linked child nodes, you can depict task hierarchies and workflows. This view helps you:
- Outline goals, tasks, and subtasks
- Clarify task relationships and dependencies
- Illustrate workflows intuitively
- Communicate plans visually to stakeholders
Use Mind Map View for: brainstorming ideas, visualizing task hierarchies and workflows.
Chat View
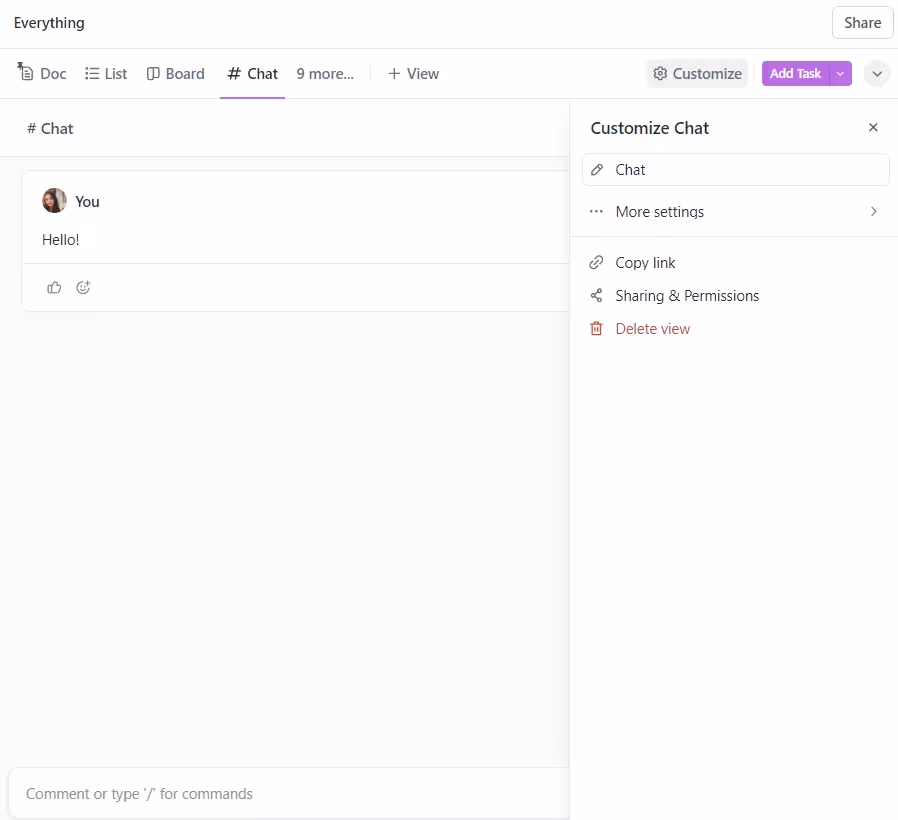
Chat View in ClickUp
The Chat view facilitates real-time communication within your team, allowing for quick discussions. You can discuss items outside of tasks in a specific location in ClickUp, and view attachments, notifications, and unfurled task links. It's a great way to keep your team's communication centralized and organized.
Key Features of ClickUp Chat View:
- Communicate instantly with team members.
- Reference and discuss specific tasks within chats.
- Easily share and access files in conversations.
- Customize alerts for important messages.
- Keep discussions organized with threads.
Currently, we don't recommend using the Chat View in ClickUp. Indeed, it's much more efficient to collaborate on tasks through the comment panel than in the chat.
Whiteboard View
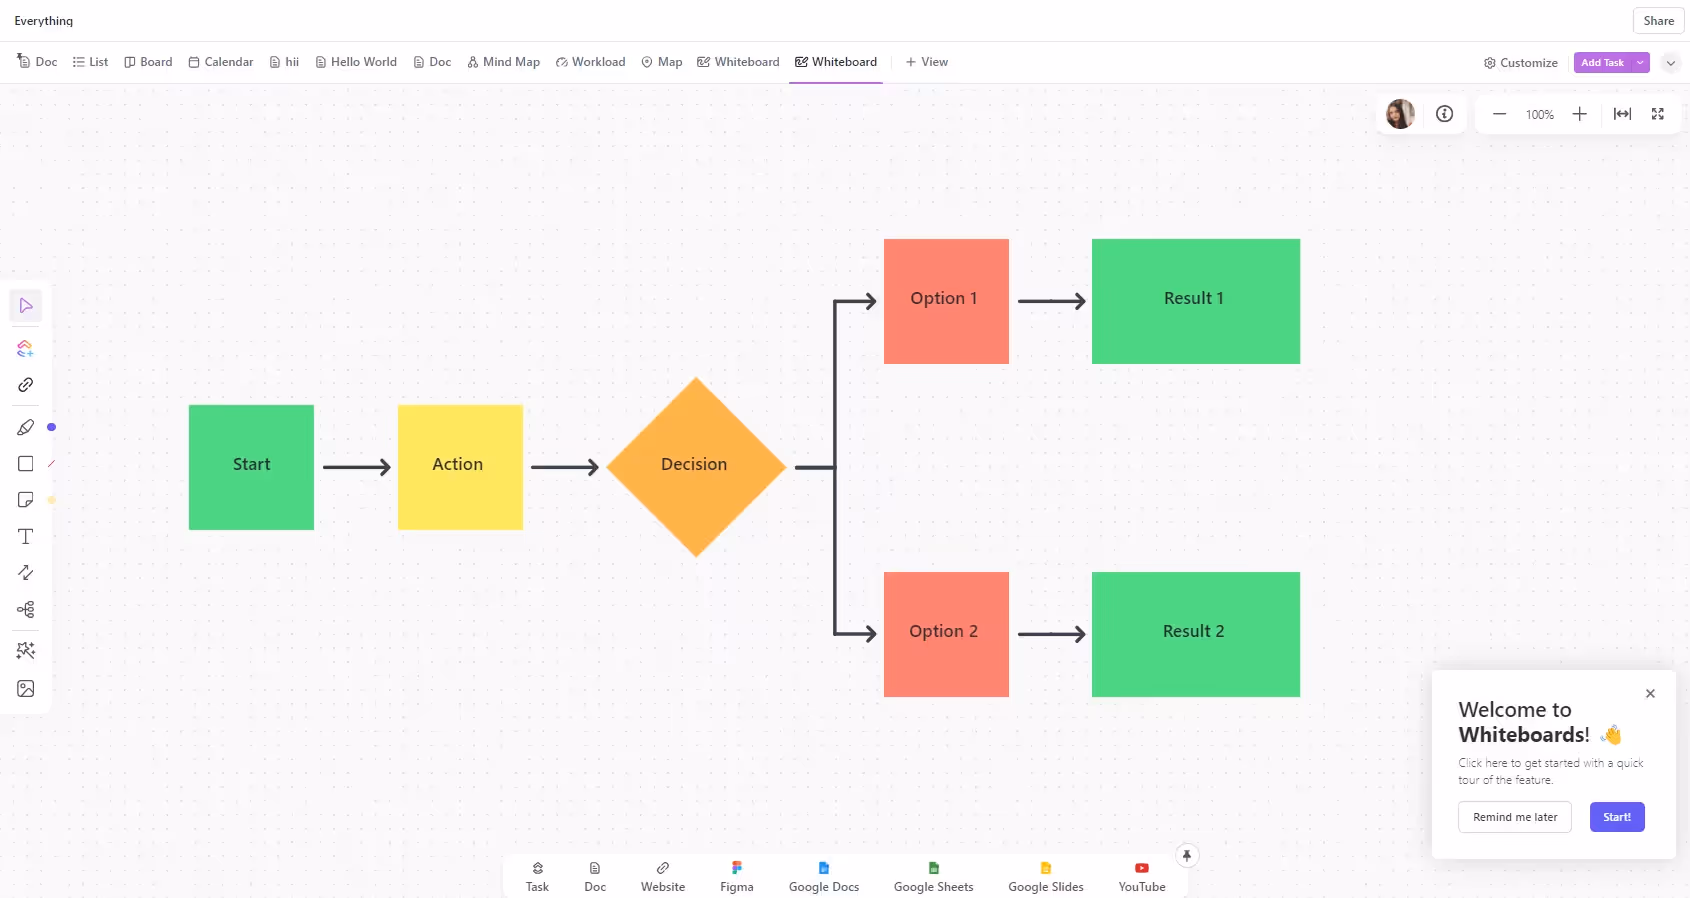
Whiteboard View in ClickUp
The whiteboard view provides a virtual whiteboard for teams to visualize concepts and ideas. With templates and integrations, whiteboards allow real-time collaboration and ideation. It's a great tool for planning, outlining, and brainstorming.
Key features include:
- Brainstorm with flowcharts, matrices, diagrams, and more
- Embed surveys, maps, charts, and other tools
- Team members can co-create whiteboards together
- Communicate ideas through text audio, and video comments
- Revisit previous versions of whiteboards
- Improve sessions with prebuilt canvases.
Use Whiteboard View for: collaborative ideation, planning, brainstorming, and visualizing concepts.
Form View
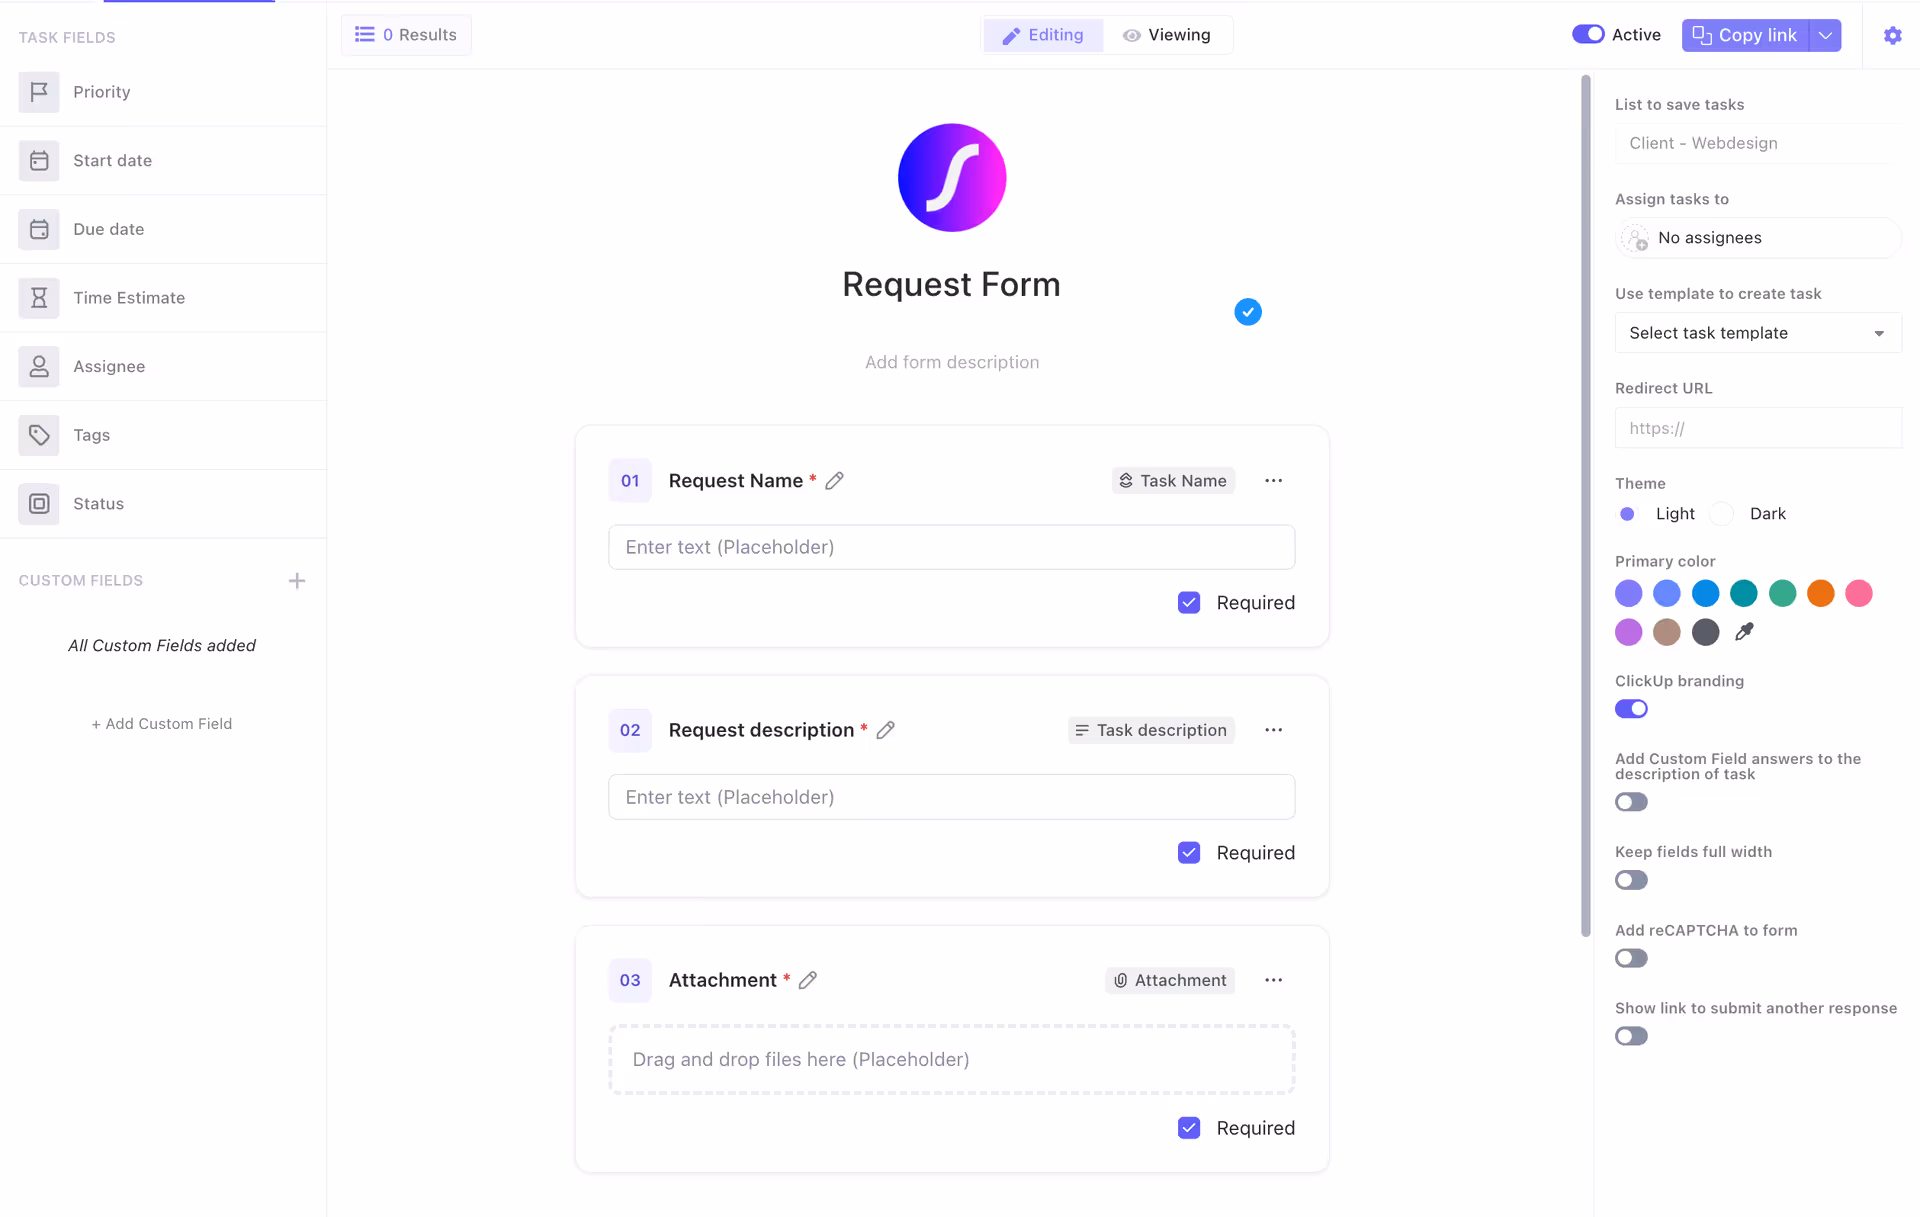
Form View in ClickUp
ClickUp Form view allows you to build custom forms to gather information from clients, users, or your team. Forms can be used for many different purposes: onboarding, hiring, asset requests, offboarding, testimonial requests, client requests, and more.
Key Features of Form View:
- Customize forms to collect specific data.
- Create dynamic forms that adapt to user responses.
- Connect forms with other tools and platforms.
- Set actions based on form submissions.
Use Form View for: gathering information from clients, users, or team members.
Embed View

Embed View in ClickUp
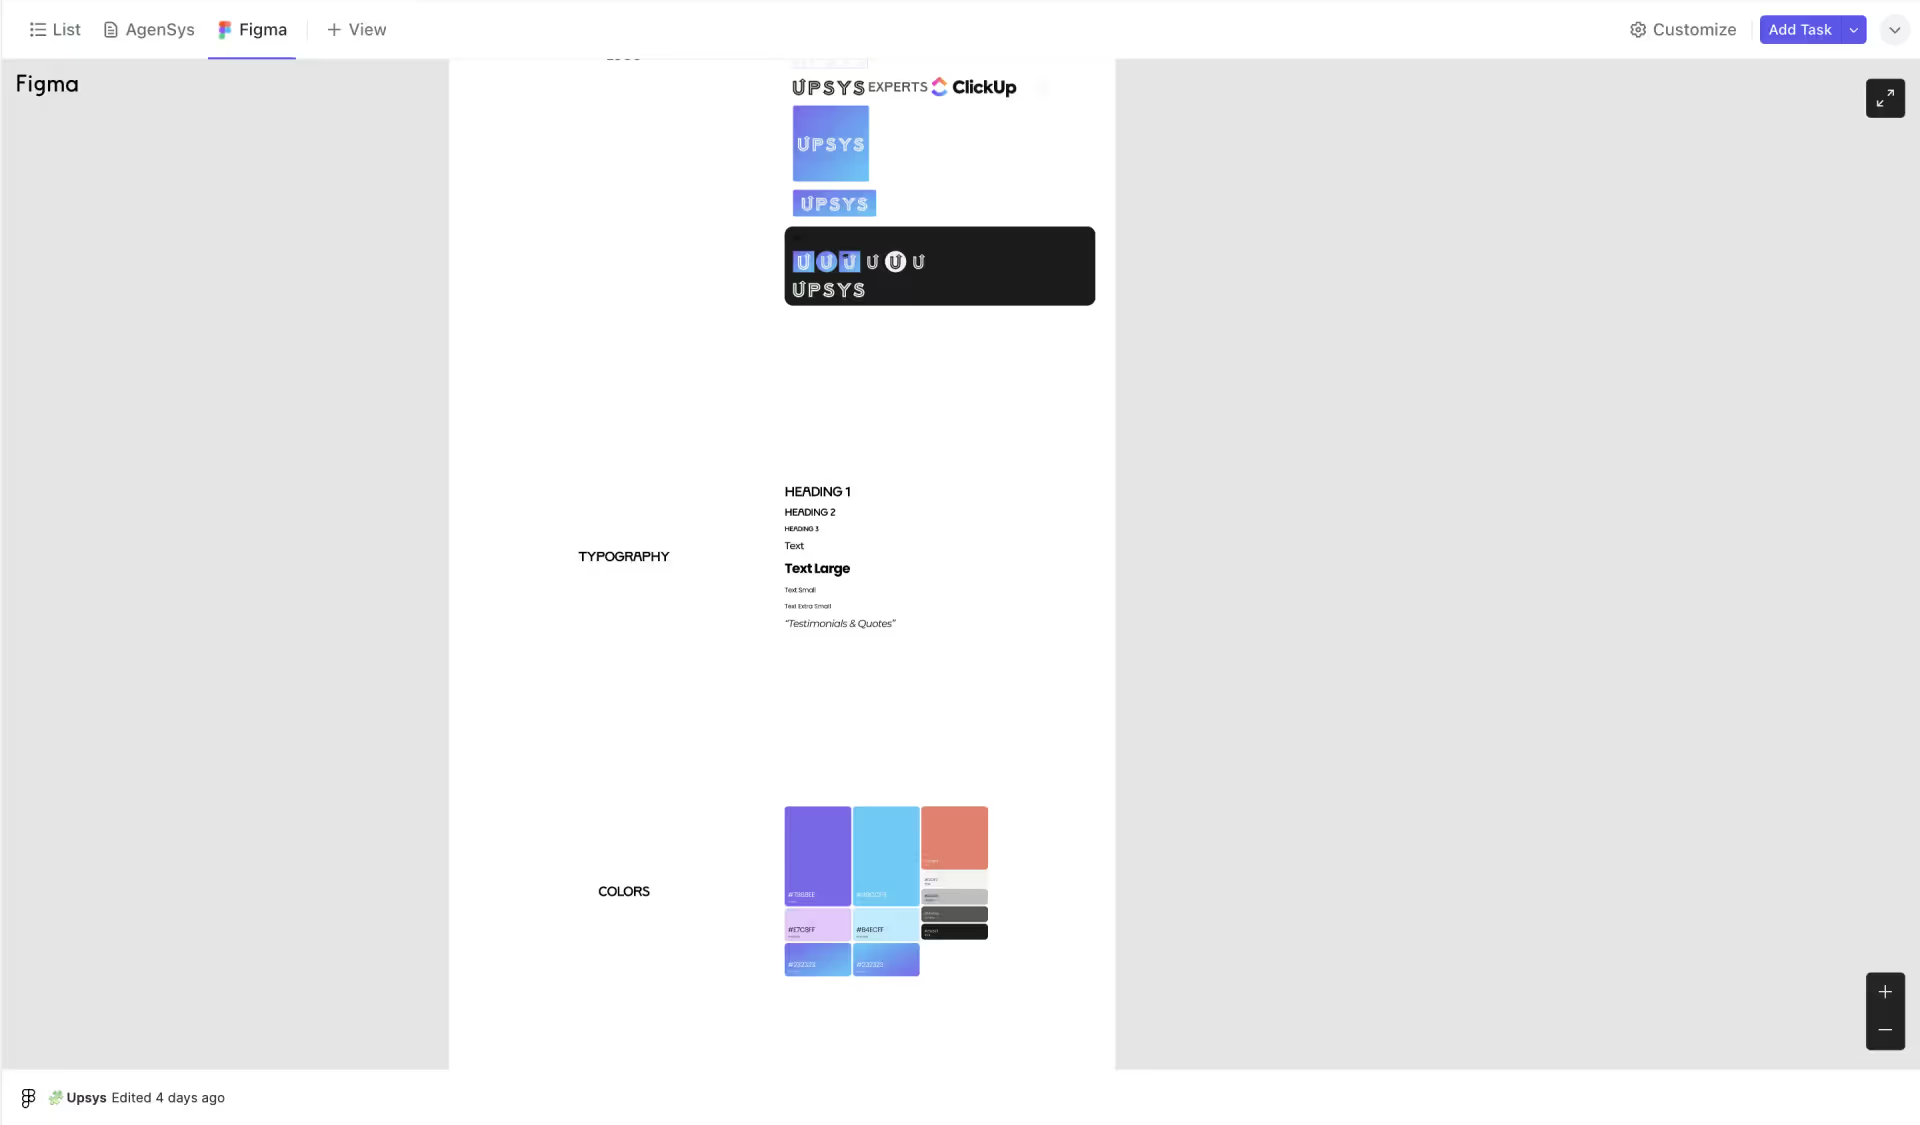
Embedding Figma in ClickUp
The Embed view allows you to bring external resources like videos, maps, project boards, and more directly into your ClickUp workspace. Rather than constantly switching between windows and tabs, you can house everything your team needs in one place.
You can embed:
- Google Docs, Sheets, Slides
- Asana boards
- Spotify playlists
- YouTube videos
- Canva graphics
- Maps and more
Use Embed View for: integrating external resources like documents, videos, boards, and other web content.
Activity View
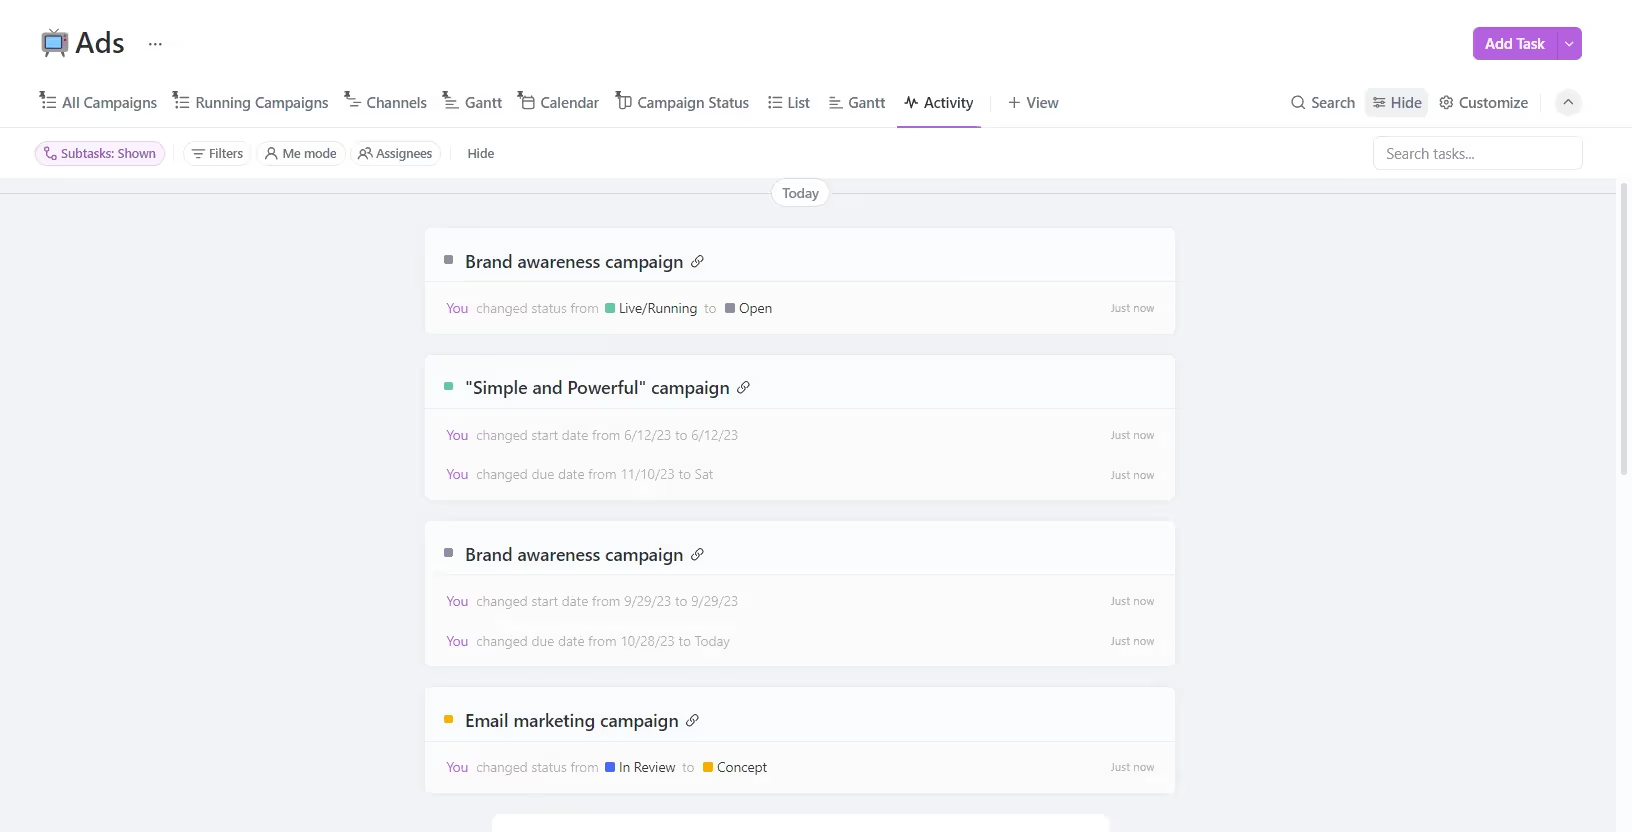
Activity View in ClickUp
The Activity view provides updates and actions performed by your team on tasks. It's a great tool for tracking changes and updates and can be customized to show only relevant activities. This view lets you see the history of different lists and tasks within ClickUp.
You'll see updates like: comments added, due date changed, task assigned, status updated, and attachments added. Similar to a Facebook newsfeed, it lets you track tasks in real time.
You'll see updates like:
- Comment added
- Due date changed
- Task assigned
- Status updated
- Attachments added
Use Activity View for: monitoring a real-time feed of updates, changes, and actions.
Managing and Customizing ClickUp Views
Available settings in views
ClickUp provides many options to manage and customize views. These features are designed to improve your project management efficiency and organization.
- Filter Views: Click the 'Filter' button at the top of any view to focus on tasks by assignee, status, due date, priority, or custom fields. Filtering views help manage workloads by showing only relevant tasks. Use the views bar at the top of your screen to switch between different task views quickly and efficiently.
- Views Bar: You can access the views bar to quickly switch between different views.
- Pin Views: Pin your most used views for easy access. Pinned views stay at the top of your screen, allowing quick switching between projects or tasks. Rearrange pinned views by dragging and dropping. Use the pin view box to keep frequently used views easily accessible.
- Make Views Private: Be sure to check the private view for tasks that only you can see. In the private view box, you can manage your personal tasks securely.
- Saving Views: Opt for 'Auto Save' to make sure all changes in a view are automatically saved.
- Grouping Tasks in a View: Use the 'Group By' menu to organize tasks by status, assignee, priority, label, due date, or custom fields. Grouping helps in segmenting tasks for better organization and offers a quick overview of workload distribution. At different levels (All, Space, Folder), you can enable or disable the Group by List option. Master grouping, sorting, and filtering to organize your tasks efficiently.
Use 'Me Mode' for Personalized Views
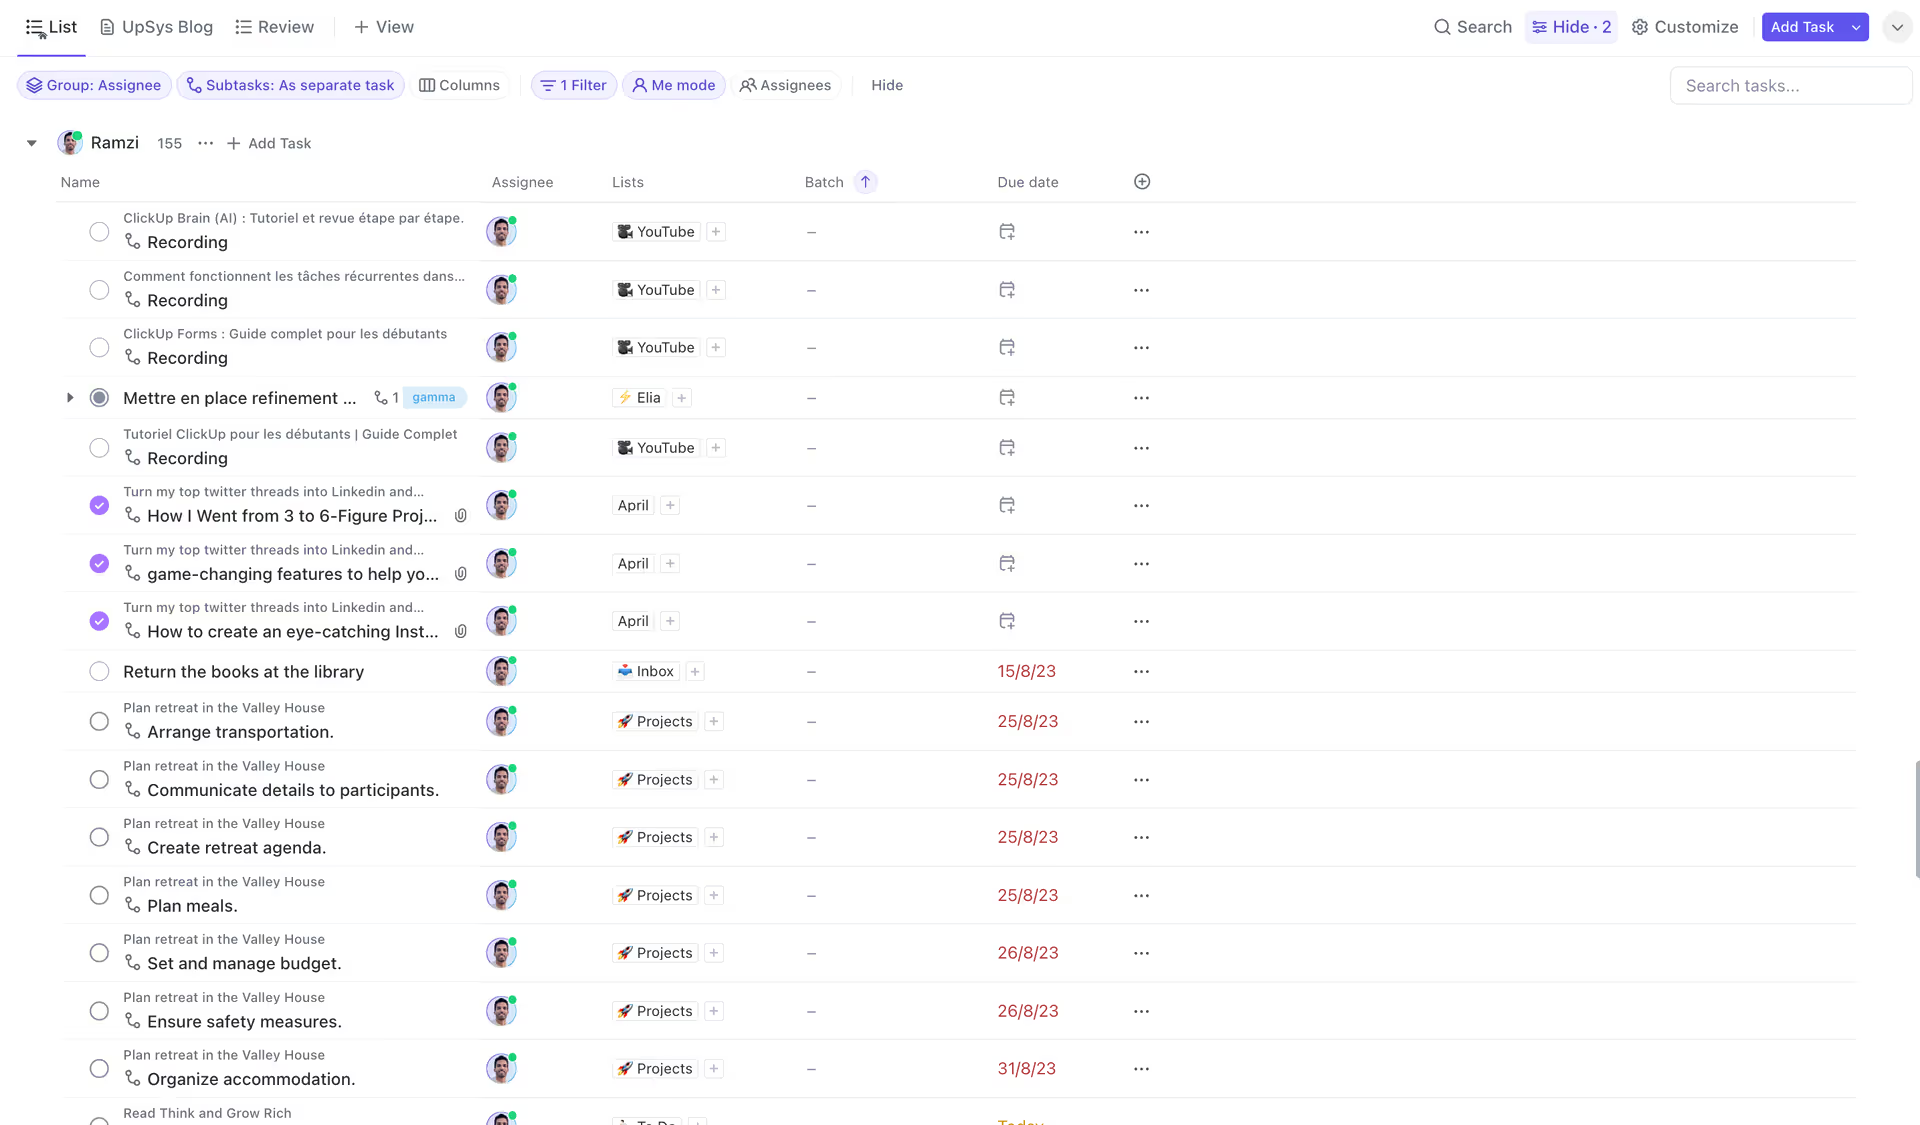
Me Mode in ClickUp
When you use the "Me" mode, you will only see the tasks that are assigned to you. Also, if you create a task in this view, it will be automatically assigned to you. This feature is particularly useful for personal productivity and makes sure that you can focus on your tasks.
To activate the Me mode, click on "Me" in the upper right corner of your workspace. To disable it, just click on "Me" again!
To set a view to Default “Me” mode:
- Click on the ellipsis ... next to the view.
- Choose "More Settings" from the menu.
- Enable the Default Me Mode option.
When the Me mode is activated, you will see the tasks that meet the following criteria:
- Assigned tasks
- Assigned comments
- Assigned subtasks
- Assigned checklist items
Note: Me Mode does not display comments assigned to teams you are a member of.
Simply check the boxes in the purple banner at the top of your screen at any time to change the items you see while in Me Mode.
People Sidebar for Team Management
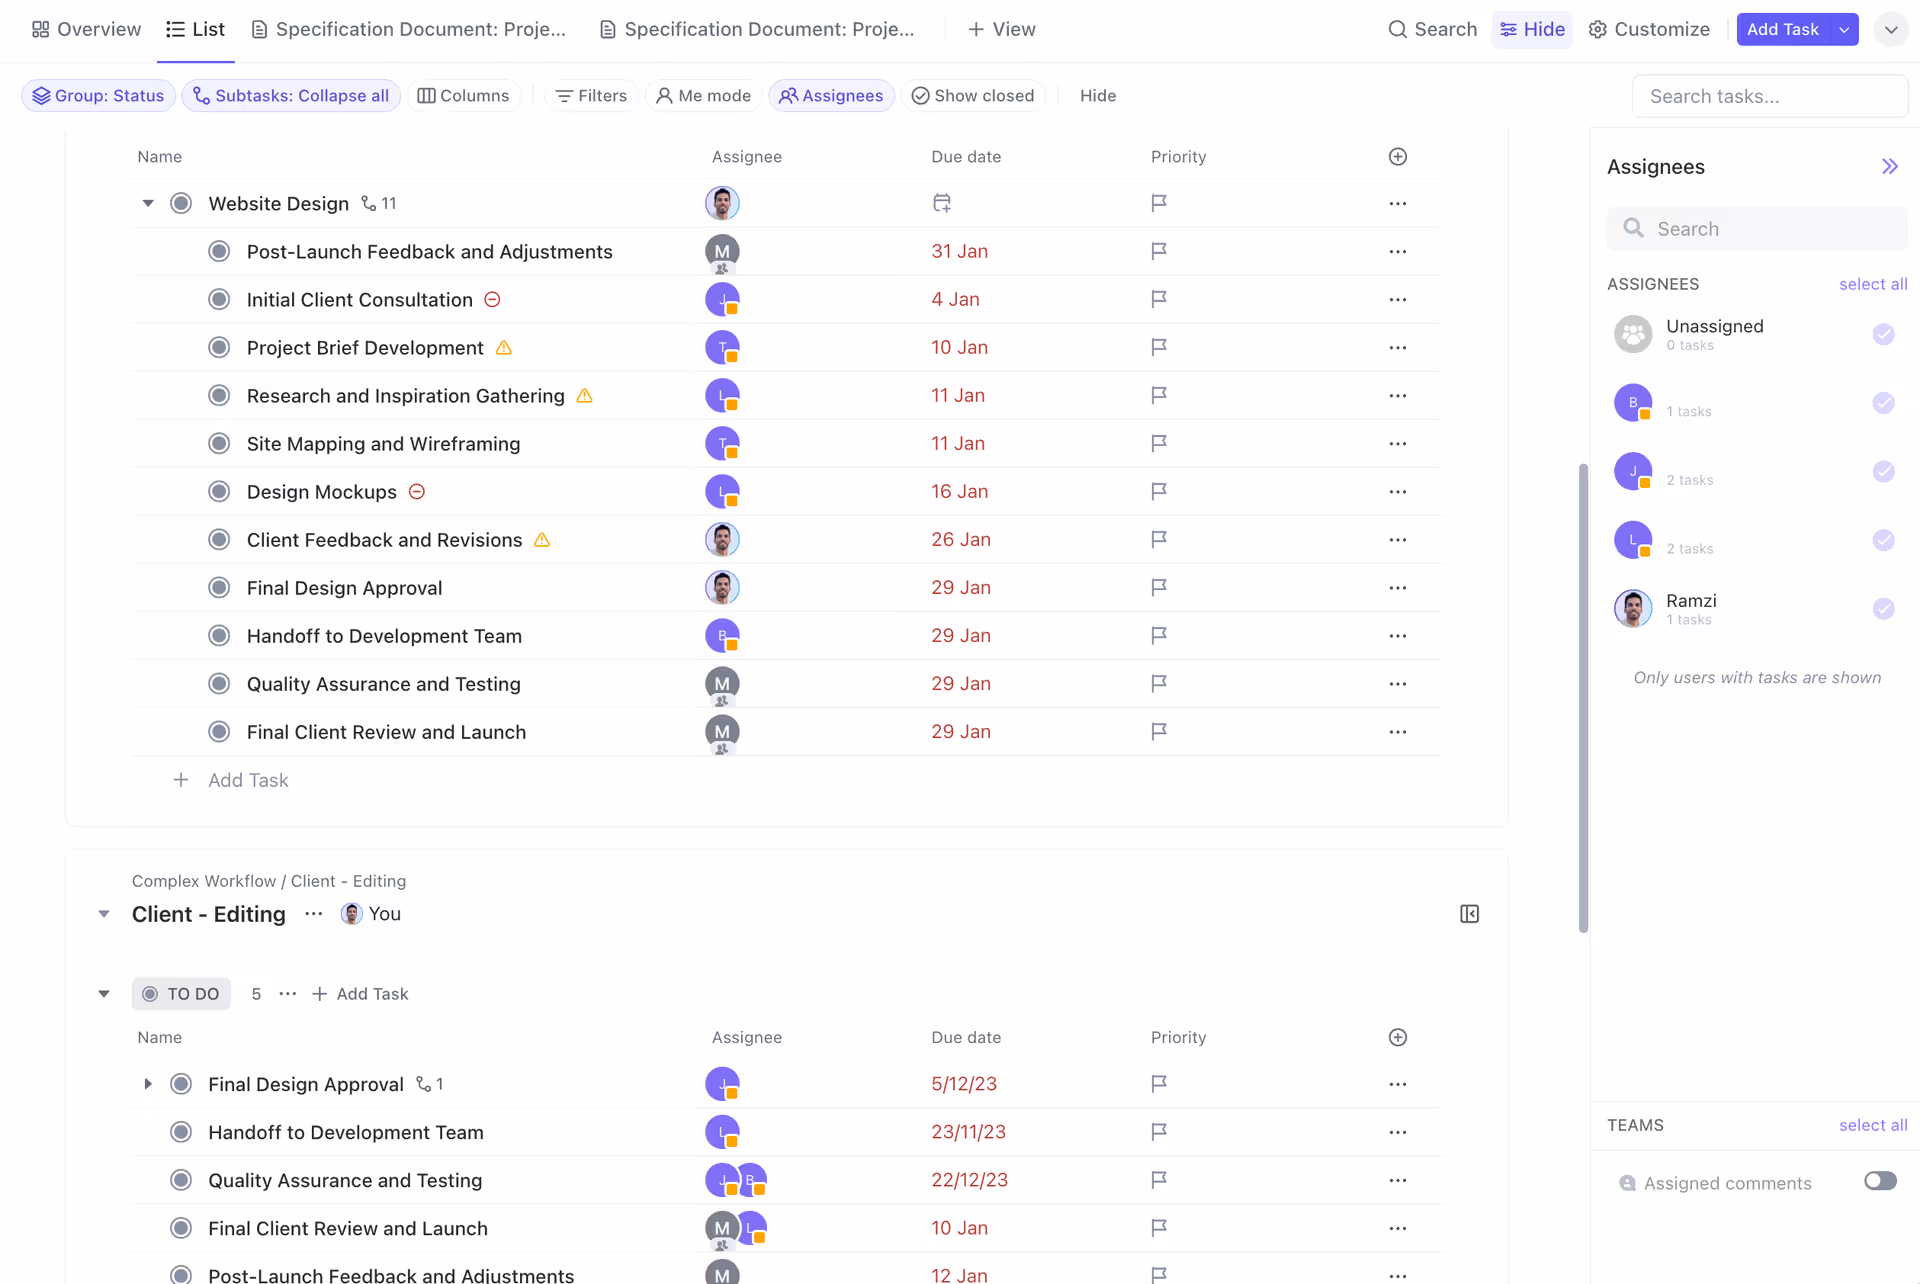
People Sidebar in ClickUp
While Me Mode filters views to your assigned tasks, the People sidebar lets managers take the opposite approach - overseeing tasks assigned to the team.
Also known as the Assignees sidebar, this feature allows you to view assigned tasks for any member in your ClickUp workspace. You can check the workload distribution across your team and make sure there are no bottlenecks.
To use the People sidebar:
- Click on 'Assignees' in the top right corner of ClickUp.
- Select the assignees you want to see in the sidebar or search for specific individuals.
- The sidebar will display all tasks for the selected assignees so you can monitor workloads.
- Disable the sidebar by clicking 'Assignments' again.
The People sidebar is invaluable for managers and team leaders who need real-time insights into their team's task distribution.
Conclusion
In summary, ClickUp's customizable views provide many options to visualize tasks, workflows, schedules, and data. Take time to explore views like Board, Calendar, Timeline, and Docs to find optimal setups for you and your team's work needs.
The key is setting views and columns to focus on the most important information and actions for each project. With practice, these views will help manage workloads, monitor progress, and boost productivity.
However, setting up ClickUp views and choosing the right views can be a complex process that requires a deep understanding of your team's workflow and needs. That's where UpSys comes in.
As experts in project management tools, we can help you set up ClickUp in a way that maximizes its benefits for your team. Don't hesitate to reach out to us for a free consultation. Let's discuss how we can tailor ClickUp to your unique needs and help your team achieve its full potential. Book your free call now!